Introduction
Manufacturing issues come in all shapes and sizes. In this post we will be taking a look at tolerances for CNC milling. CNC milling is used to develop both parts and tools (eg: injection molds) so understanding tolerancing for CNC helps guide our intuition for tolerances in other manufacturing processes.
Given the variety of different parts, setups and milling machines, it can be difficult to develop useful guidelines for part and feature design. For parts with a limited number of functional interfaces driving the tolerance specification (for example: a bearing press fit bore) it is important to understand if the features you design are even possible, and if so at what cost. For parts that function as part of a multi part stackup it is essential to perform a statistical tolerance analysis to give you a sense of the tradeoffs you can make between part and feature tolerances while ensuring repeatable assembly functionality. These tolerance analysis should be informed by your manufacturing process knowledge, and this article will help you build that foundation.
Our Approach
In this post we will focus on understanding CNC machine accuracy, how this translates to part accuracy, and what additional sources of error we should be planning for in our designs. For each of the common error sources we will discuss the kinds of parts that may be impacted and what you can do as a mechanical engineer to mitigate risks of designing costly or impossible to manufacture parts.
CNC Machine Positional Accuracy
Just how accurate are modern CNC machine tools? Even relatively low cost production CNC machines like the HAAS VF4 VMC have ±11 micron positional accuracy at feed rates up to 1000 mm per minute (as tested using the ISO 230-4 standard). At slower feed rates positional accuracy and repeatability of ±2.5 microns is not uncommon.
Cutter Compensation
Perhaps the most game changing feature of modern CNC machines is cutter compensation. Surprisingly, very few mechanical engineers know what cutter compensation is. Critically, cutter compensation (G40, G41, & G42 for you G-Code nerds) allows CNC programmers to generate tool paths based on nominal (ie: estimated) tool geometry.
When a CNC programmer generates a tool path using a ½” diameter end mill, they assume the tool is exactly 0.5000 inches in diameter. In reality, there is an error associated with the manufacturing (grinding) of the end mill that must be accounted for. In some cases, this error can be larger than the target feature tolerance. This is where cutter compensation provides enormous value to machinists. Cutter compensation decouples the end mill diametral and length accuracy from the part accuracy. This allows tool path programming with no knowledge of what specific tool will be used to cut a part on the shop floor.
Modern CNC controllers achieve this compensation by dynamically generating new “offset” toolpaths based on the difference between the nominal as programmed tool and the actual tool geometry as measured. Additionally, some CNC machines include toolsetting measurement devices that allow operators to use automated routines to measure and store the difference between actual and nominal tool geometry in machine memory. The figure below shows the difference between a nominal tool path and a diameter error compensated tool path.
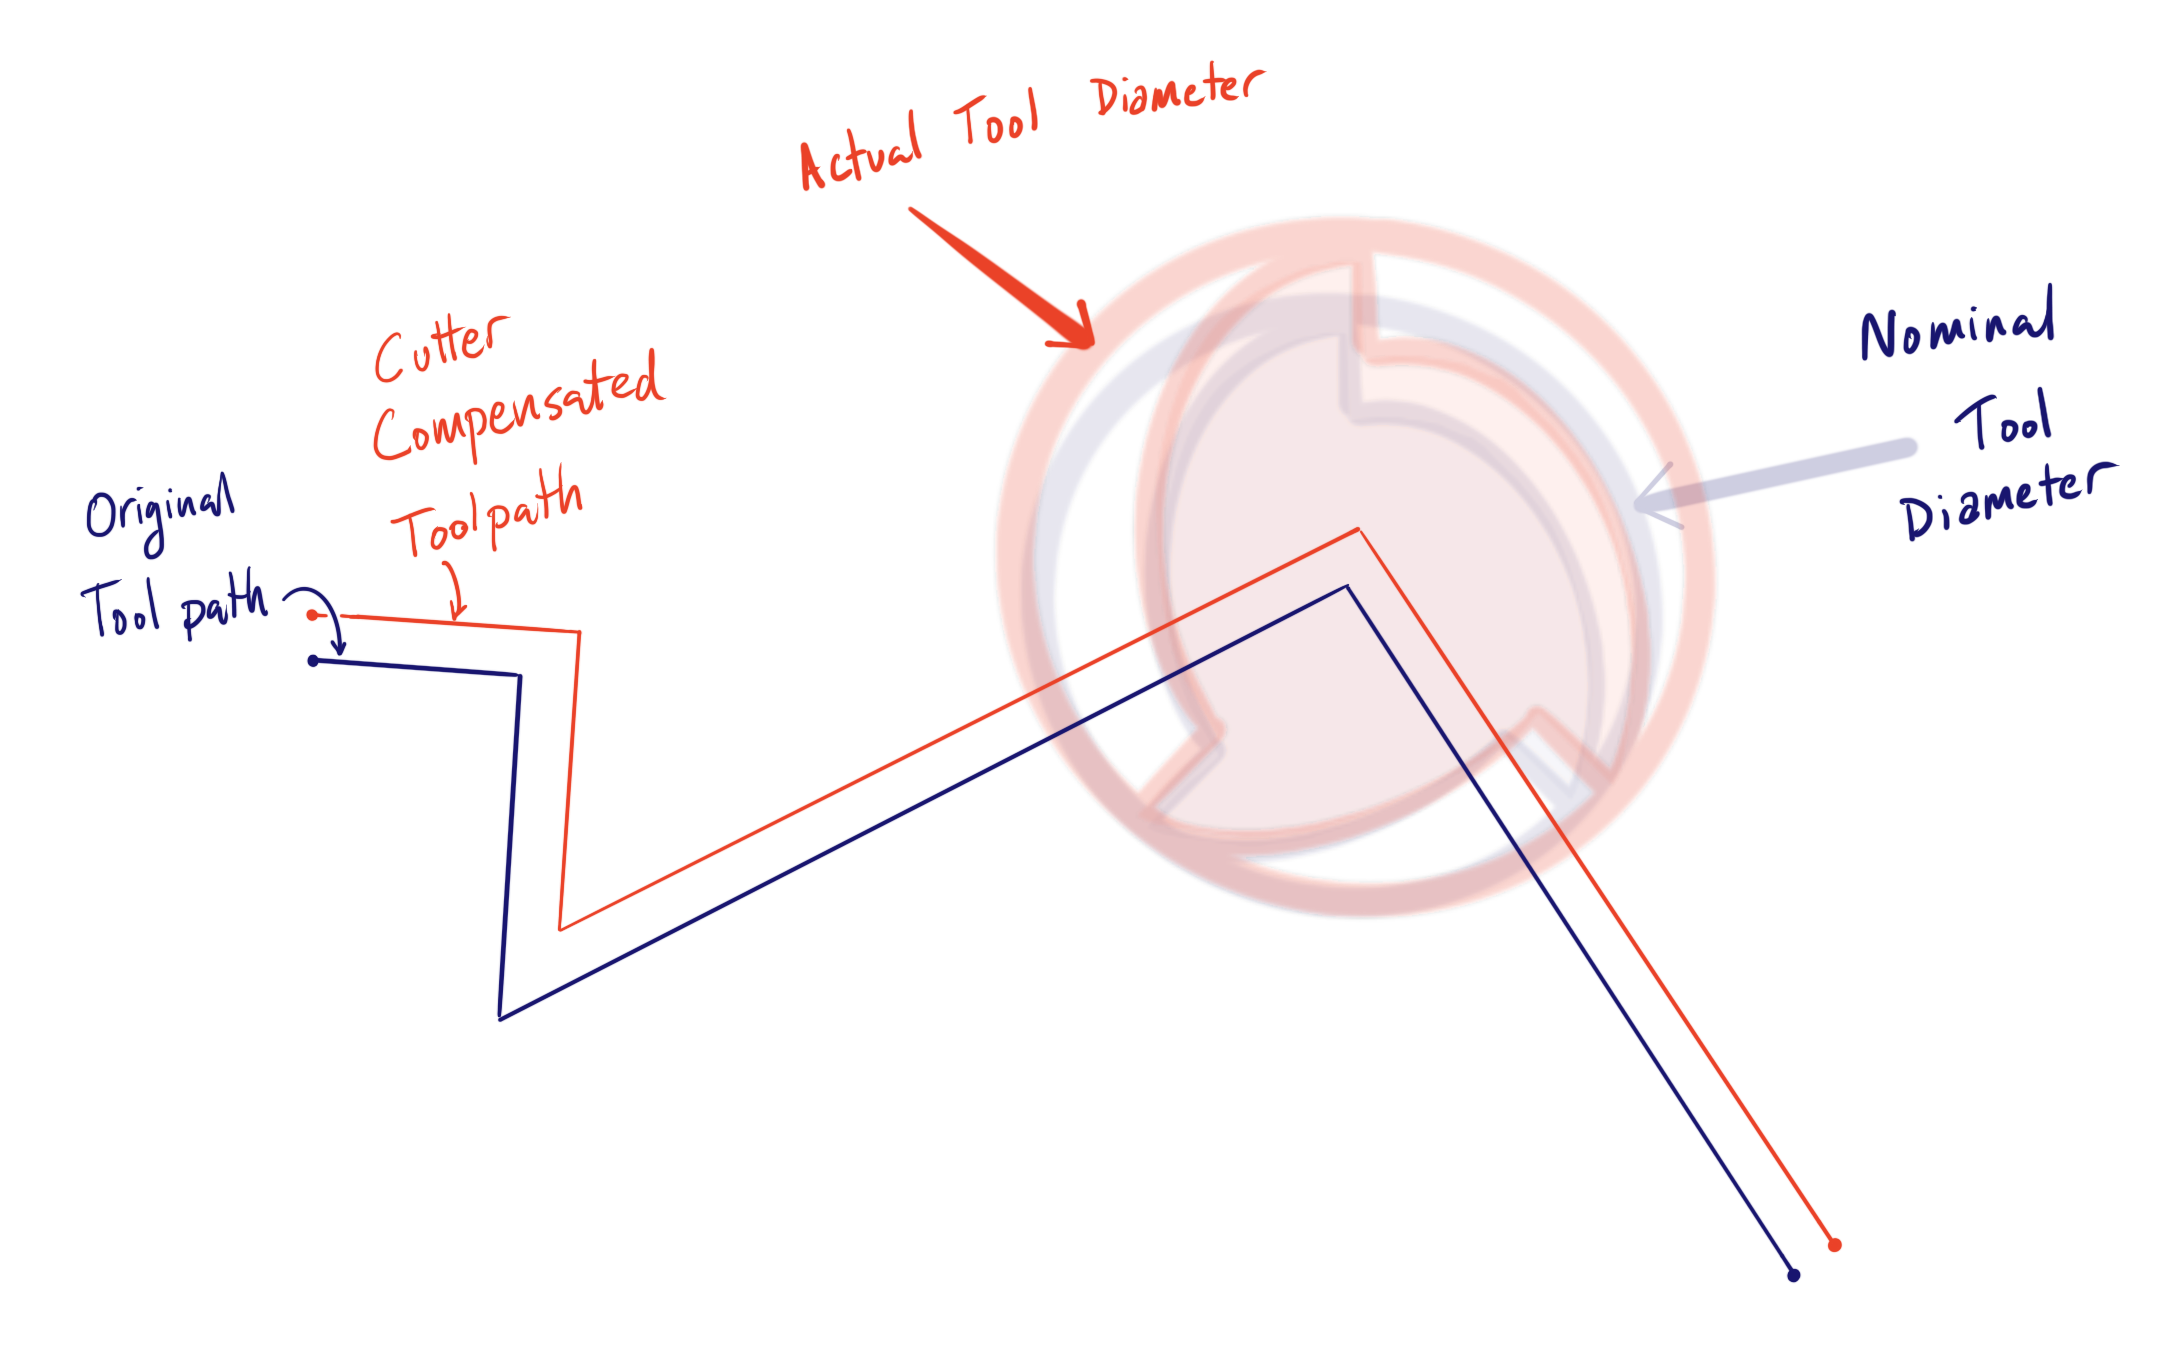
It can’t be overemphasized how important cutter compensation is for lowering the cost and complexity of creating tight tolerance features. When combined with good feeds and speeds and proper finishing passes, this can yield 0.001” accuracy or better (in metals) effectively for free. Below +/-0.001” feature tolerance, machinists must be significantly more careful. Proper machine warmup, climate control in the facility, tool health monitoring and repeatable fixturing become critical for achieving tight tolerances repeatedly.
If machine tools are accurate and cutter compensation is used, you might be wondering why so many major service bureaus and manufacturing networks (Protolabs, Xometry, Fictiv) only offer standard tolerances in the ±0.005”/0.1mm range? The truth is there are many other sources of error that must be accounted for. Because of this it becomes impossible to guarantee a blanket tolerance that can be applied across a range of part sizes, geometries and materials without adding in a safety factor. A relatively large tolerance is promised mostly as a response to the inherent complexity of machining custom parts, and the difficulty of guaranteeing something that the customer can understand. A benefit to working with individual job shops is that the discussion around tolerances can be much more nuanced and realistic, often resulting in better parts. The downside is that quoting and communication can be slower, resulting in more overhead for engineers.
Machine Accuracy is not Part Accuracy
What we can infer from the observation above is that part tolerance is not driven primarily by machine accuracy, but rather by a confluence of error sources associated with machining strategies and tactics employed to realize the desired part geometry. Understanding these sources of error can help you establish realistic tolerances across the range of parts you might have in an assembly, balancing precision and part cost optimally. To gain this understanding we will review common sources of error and the types of parts where you should be on the lookout for these errors.
Sources of Error
The following sources of error are commonly seen in most parts, but must be analyzed in the context of each part individually in order to determine if they are significant or negligible.
Machine tool compliance
For large parts such as castings and tooling plates, the size of the part and the volume of machining often requires heavy cuts using big tools at high material removal rates. For these parts, the machining forces can become so large that the machine tool itself deflects significantly. This can cause surface finish chatter or angular tool deflection when making face cuts. One common area of concern is the machining of high pressure sealing faces on large castings. If this is done on a small milling center it can lead to surface discontinuities that are hard to seal with gaskets or o-rings.
Cutting tool compliance
It’s important to remember that the cutting tool itself has a spring constant. The stiffness of a square end mill can be modeled to first order approximation as a cantilever beam. The formula below relates the maximum tip deflection of the beam to the beam geometry and applied load.
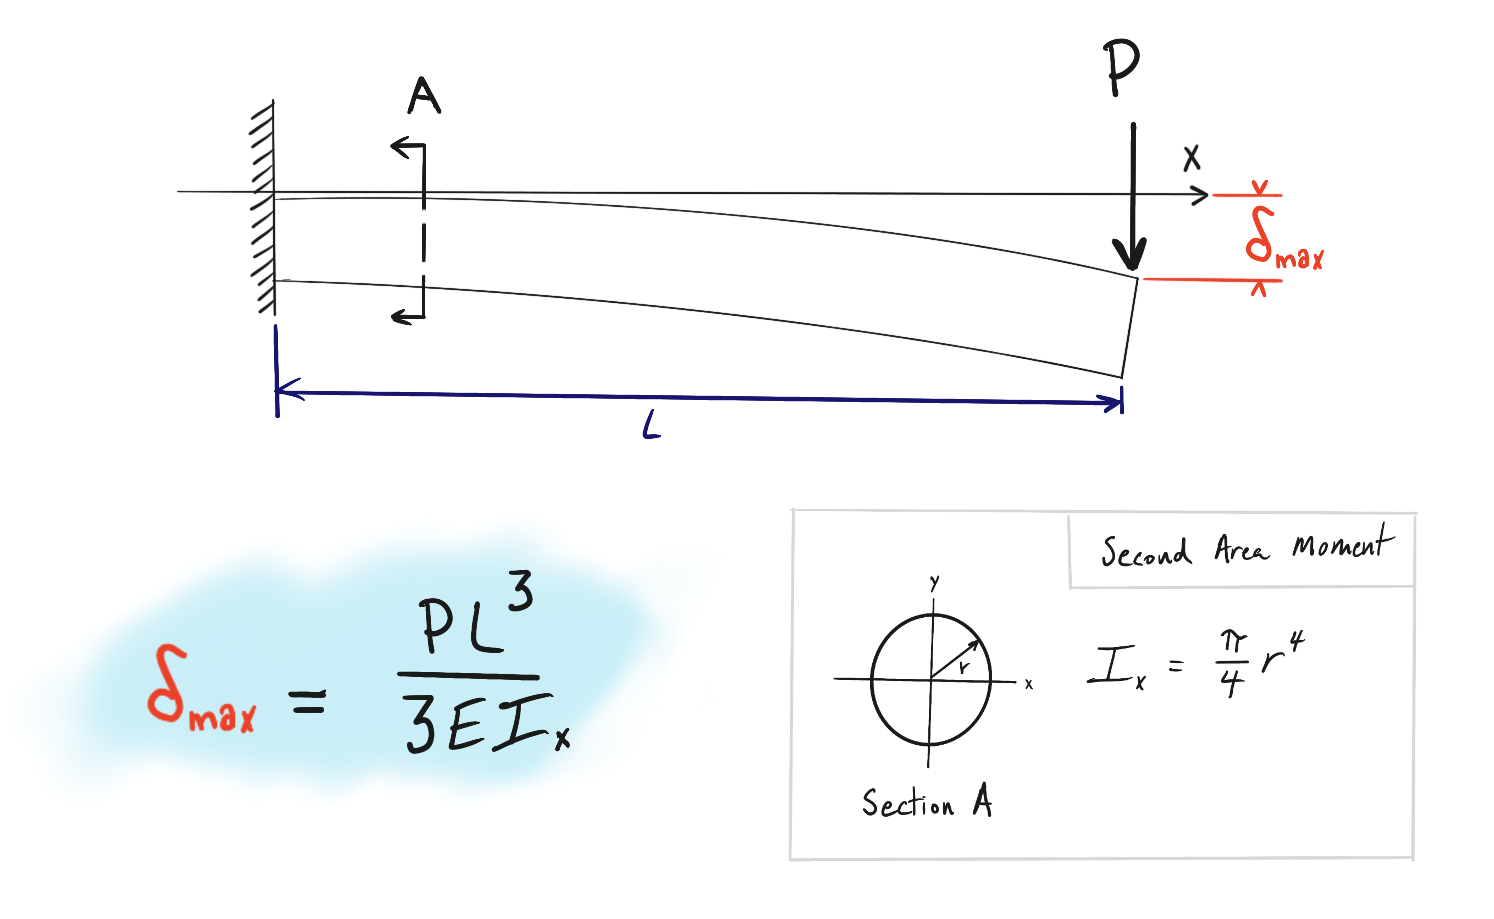
There are two key scaling factors we can take from the beam equation and use to understand manufacturing tolerances of features cut with end mills. The first is that tip deflection of a cantilever beam scales as a function of the beam length (in our case the tool extension from the tool holder) to the third power. A 2X increase in tool extension length leads to an 8X reduction in stiffness and a corresponding 8X increase in deflection under identical loading. The second is that stiffness scales as a function of radius to the fourth power. A 2X increase in tool radius results in a 16X increase in stiffness.
The lesson here is that precision features that can only be created with small tools are at greater risk for having tapered profiles or other inaccuracies, or they may be accurate but costly to produce. If you design a precision feature that must be machined with a small tool, it is helpful to check if a CAT40 ER16 tool holder can clear the adjacent features of the part, allowing your machinist to use as short of an end mill as possible. Maritool has drawings and STEP files of common tool holders available for download here.
Workholding accuracy and operator error in fixturing
For parts without parallel planar faces, custom fixtures must be manufactured in order to secure the part during secondary machining operations. A common job-shop technique is to use soft vise jaws with the profile of the part machined into the face of the jaws. The diagram below shows a typical soft jaw holding a part with an irregular profile.
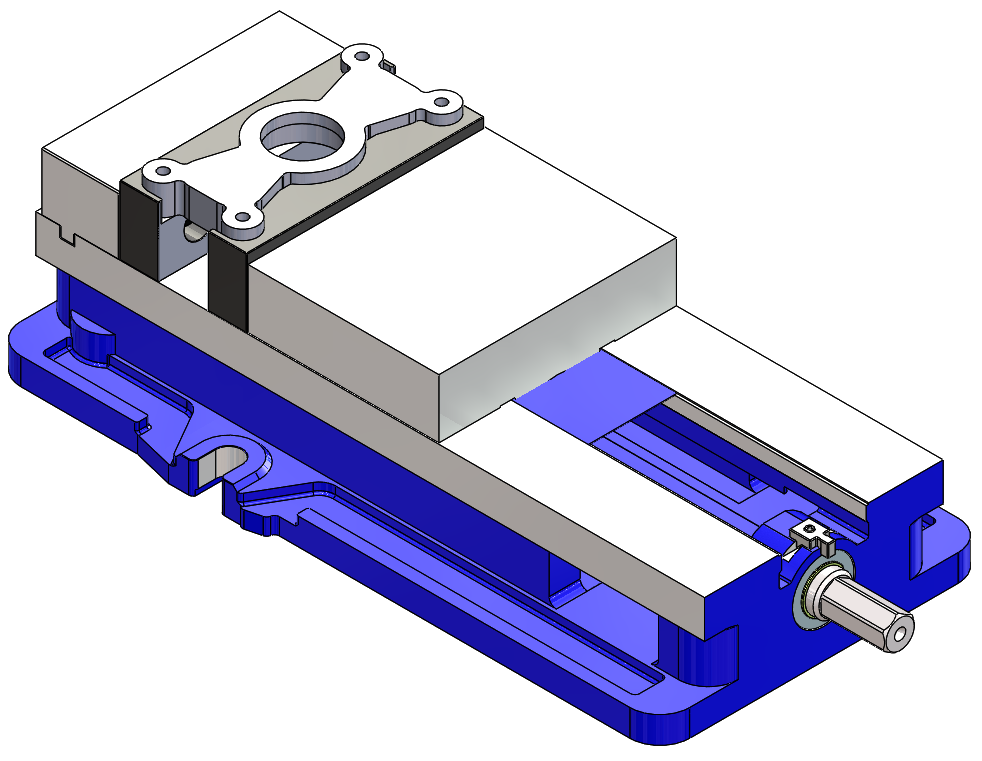
The soft jaws will have their own manufacturing tolerance from the machining process. This can lead to errors in part positioning during secondary operations. Most commonly this shows up as misalignment between blended or coincident features across primary and secondary operations. For parts with profiles that are taller than the length of the end mill used to cut them, a step or surface discontinuity can be created by improper registration in the soft jaw. For deep through- hole bores created in two operations this can cause a lack of concentricity or circularity in the bore. For any set of blind features that require precise alignment between opposing faces this can be a nightmare.
In addition to inaccuracies in fixture geometry, debris or metal chips from previous operations may be left in the fixture accidentally. This can cause both a misalignment of the part in the fixture as well as local damage where the metal chip is pressed into the machined surface of the part.
Deflection caused by workholding
Lightweight parts common in aerospace, high performance automotive and other machine design applications often have low stiffness relative to the magnitude and direction of clamping loads they will see during manufacturing. In particular, the soft jaw fixtures used during secondary machining operations can cause both in plane and out of plane bending. For parts with poor in plane stiffness this can lead to poor registration between first and second operation features. The image below shows a part with poor in plane stiffness, along with a finite element approximation of deformation and stress due to workholding.

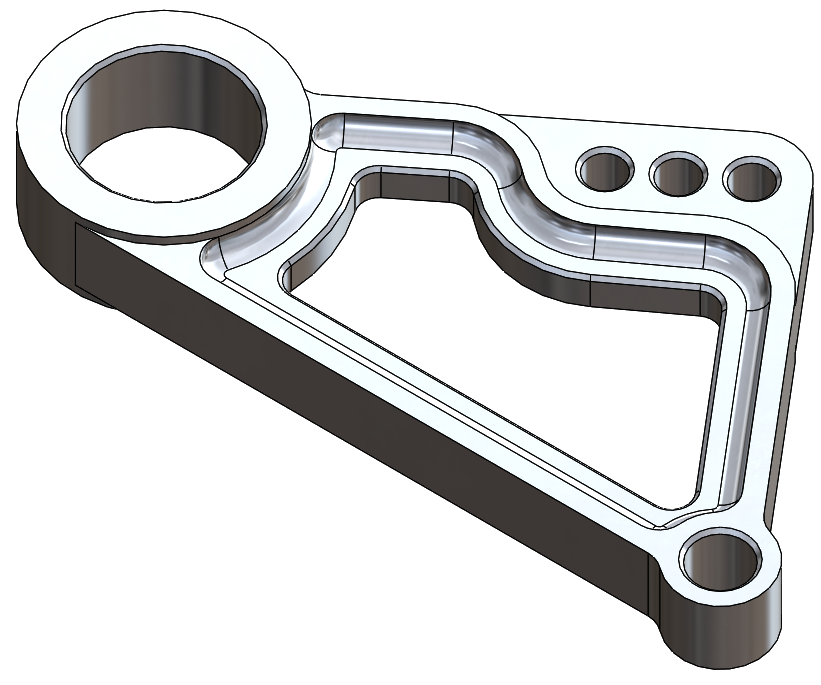
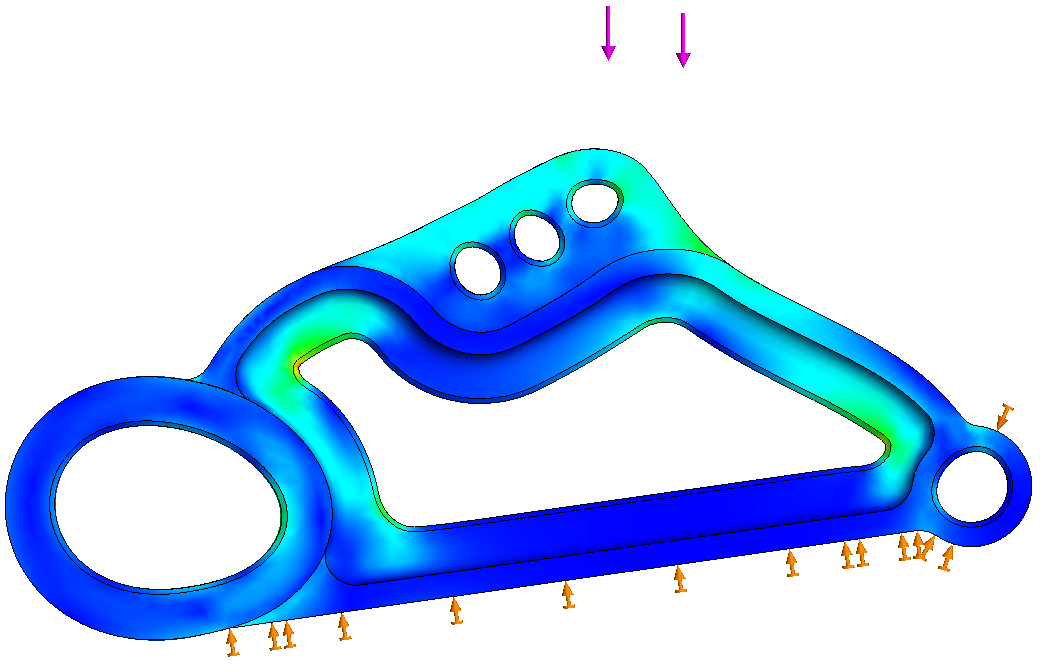
A telltale sign of this error is a misaligned deburring pass or inconsistent chamfer width on one side of the part. Now imagine a similar part without the through hole feature, but also without the mid plane symmetry.
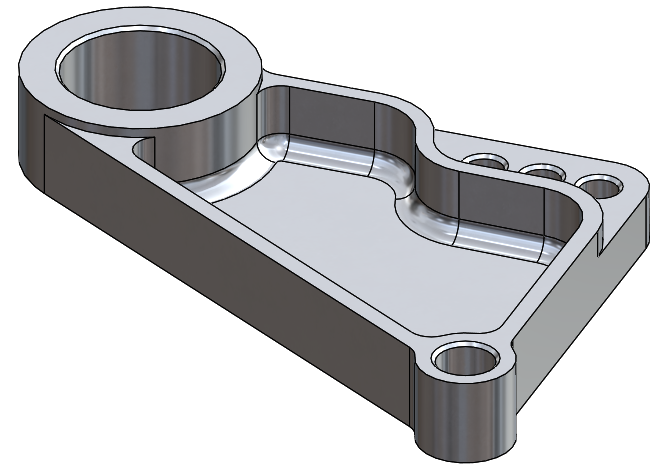
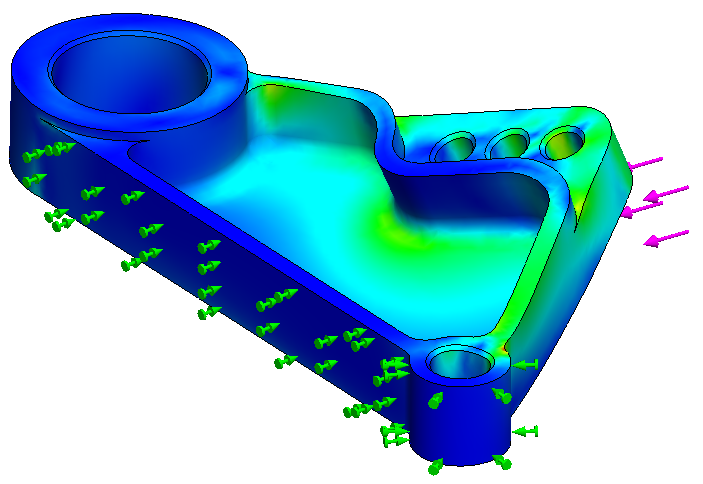
Without the through hole feature you might expect this part to be stiff enough to prevent significant deformation when clamped in the soft jaw fixture. In terms of in-plane deformation this is true, but out of plane deformation is possible when parts have deep pocket features without midplane symmetry (ex: a single deep pocket vs matching depth pockets on both sides). This can cause out of plane bowing under load, resulting in poor parallelism, flatness and thickness tolerance. The image below shows this same part deflecting out of plane due to simulated clamping loads.
Feature Compliance
Thin walls, webs, pocket bottoms, flanges, and cantilevered features are much more likely to exhibit vibration than stiffer features. Primarily because the RPM range of CNC spindles (around 3000 - 10,000 rpm) excites parts in the 50 - 166 Hz resonant frequency range. This can be extremely difficult to predict ahead of time, but some simple guidance still holds. When designing compliant features like snaps and flexures, take care to design in the compliance only in the direction needed to support kinematic functionality. Features and parts that have compliance only in one plane are often able to be machined through proper workholding strategy and well designed tool path tactics. Parts that have low stiffness in multiple planes require expensive reinforcement fixtures or are impossible to machine.
Often a small amount of reinforcement at the web or flange mid-span can increase the stiffness of the feature such that vibration is no longer a problem. When executed correctly, these features will add very little weight or manufacturing complexity. A few examples of vibration prone features and vibration mitigation reinforcement are categorized and shown below.
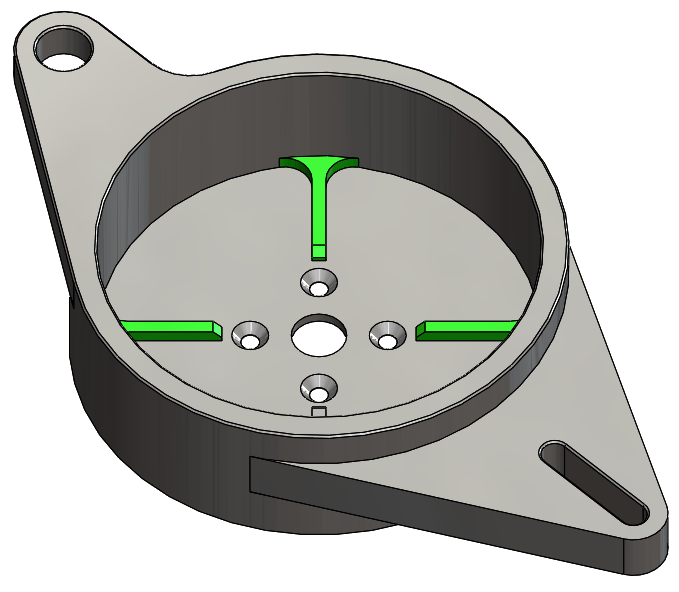
Thin Pocket Bottom
Problem part: (shown with section view as well)
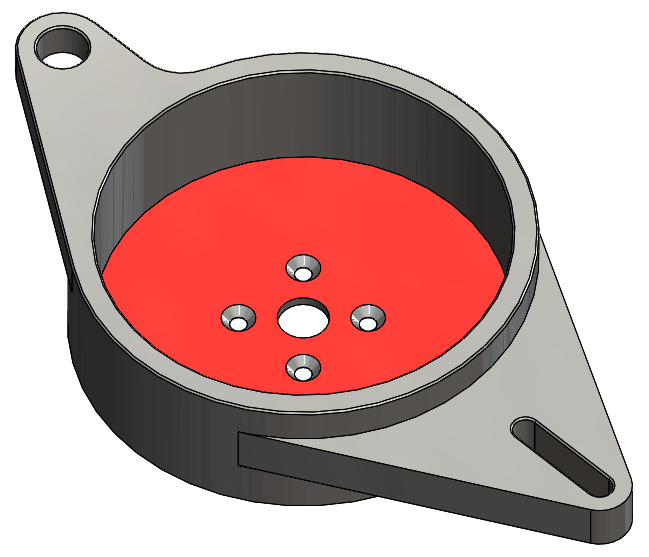
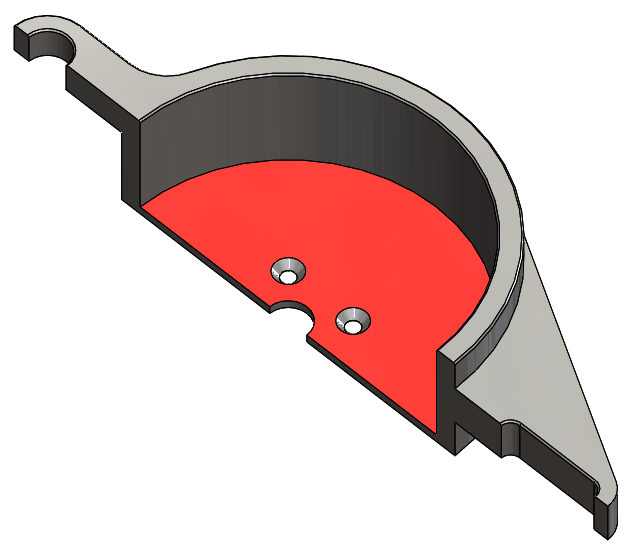
Solution: small reinforcing webs extending radially from the pocket sidewall inward, eliminating drum head modes of vibration.
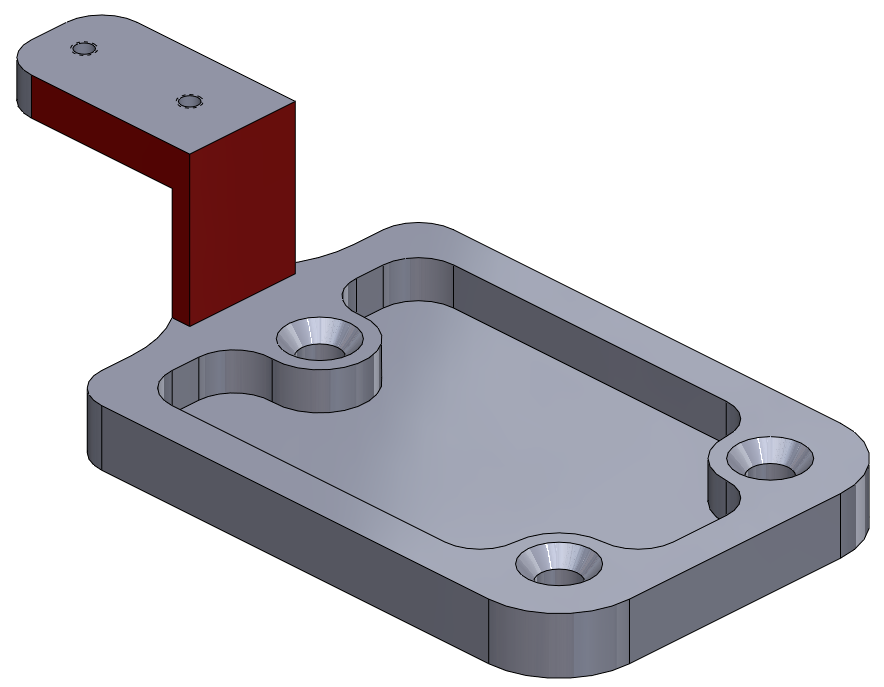
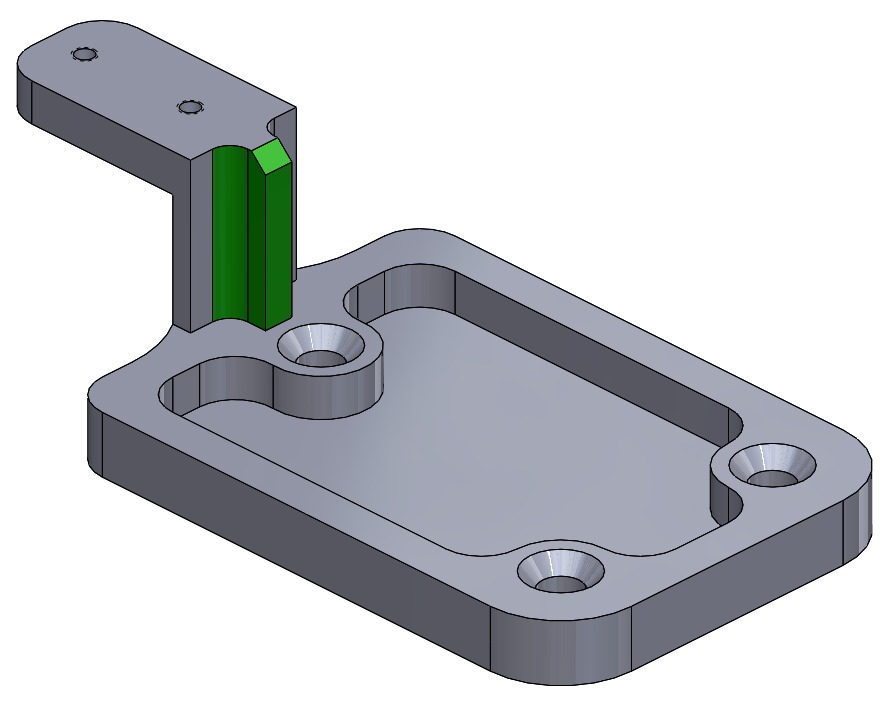
Thin Cantilever Feature
Problem part: simple bracket with thin cantilever mounting tab
Solution: mid span reinforcement flange
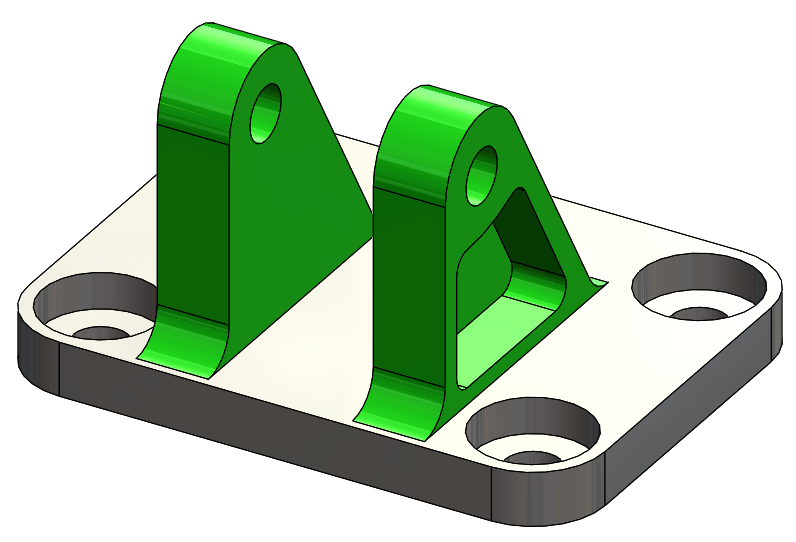
Clevis Mounting Bracket
Problem part: mounting bracket with thin clevis tabs.
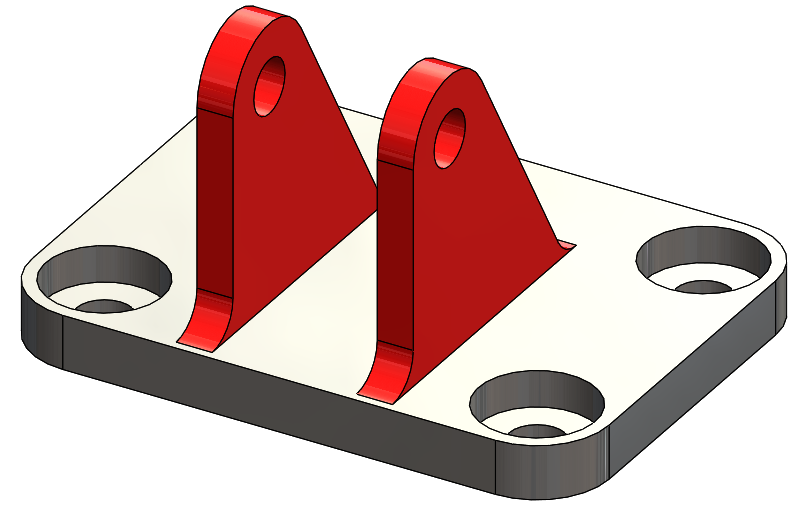
Solution: thicker pocketed clevis tabs
Stock material internal stress
Machined parts start as plates, bars, rounds or other forms of stock material. This stock material has an internal state of stress that must be considered. For example, in a cold rolled steel bar, the rolling process is used to draw down the thickness of the bar. Often, this causes the surface of the material to have residual tensile stress. The stress distribution through a cold rolled stock bar is diagrammed below (note: this does not generalize to all cold rolled stock).

Now imagine that the upper portion of this bar is faced down in the process of machining a part, removing the upper tensile stress region only. The removal of the tensile stress region gives rise to a new equilibrium condition where compressive stress and tensile stress is balanced through warping of the stock.
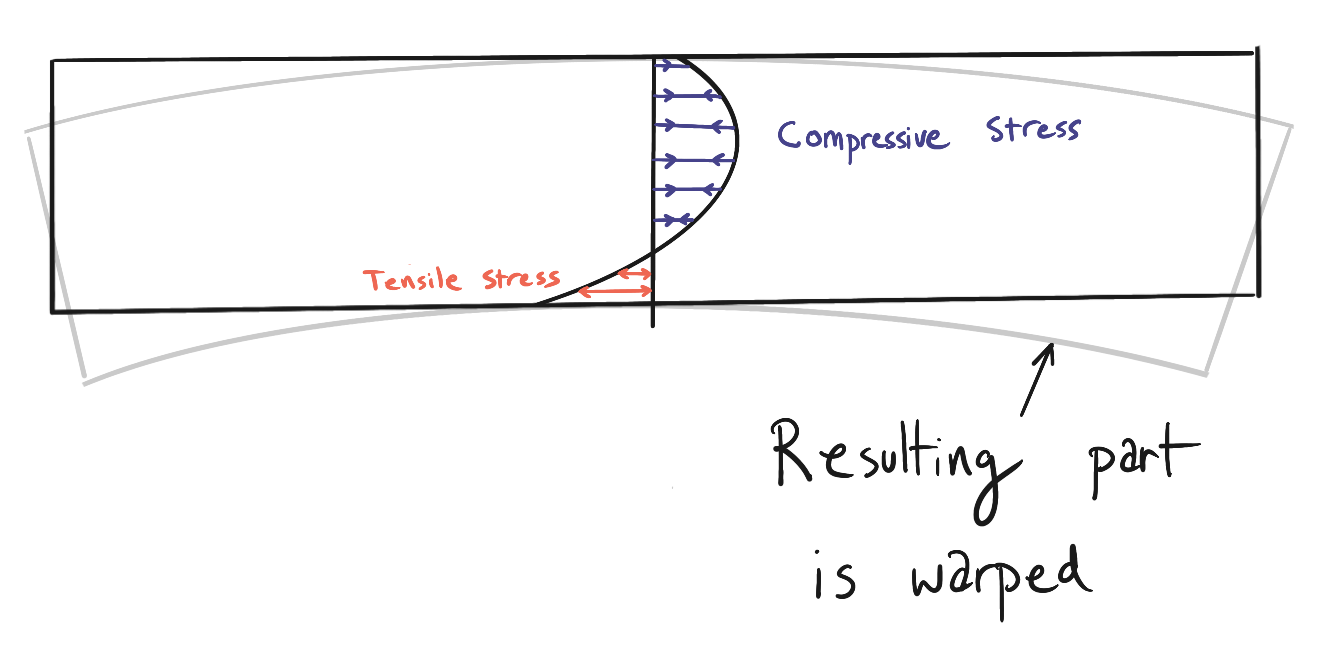
Another source of internal stress, particularly for extruded aluminum parts, is heat treatment. Quenching tends to embed a tensile strength throughout the skin of the extrusion, while the core is under compressive stress. Interestingly, NIST, Boeing, and Alcoa have studied this phenomenon using neutron diffraction. A brief summary of their results can be found here.
Machine accuracy
Machine accuracy can be thought of in terms of the two primary types of machine motion, linear and rotary.
- Linear: We know already that linear motion is highly accurate and repeatable in modern CNC mills. Essentially this error can be neglected for all parts with tolerances greater than ±0.001. For tooling plate work and extremely high accuracy bore interpolation with true positioning and cylindricity requirements below 0.0005” and into the millionths, a jig boring machine should be considered instead of a vertical mill.
- Rotational: Though easy to understand in principle, it is difficult to predict how errors in the rotational accuracy of 4th and 5th axis setups may impact your parts. This is primarily due to our inability as engineers to know in advance where our parts will be positioned in the machining envelope. Any time a feature requires rotary indexing, 3+2 machining or full five axis motions, the rotation of the part will induce errors in both angular (B and C axis) and linear (X,Y, and Z) positioning. The key thing to understand is that although rotational error may be low, it can result in large linear errors when the part is positioned far away from the axes of rotation. For cosmetic parts with blended surfaces between multiple faces, or chamfers that follow non-planar profiles, this can result in cosmetic defects. Features cut from different approach vectors may not blend or align smoothly, leading to discontinuities or abnormalities in surface finish.
As always it helps to lean on the math for a deeper understanding. Using the Haas TR210 dual axis trunnion rotary table as an example, we can see from the specifications sheet that the accuracy of this setup is ±15 arc seconds with 30 arc seconds of backlash. In the worst case this sums to 0.0125 degrees. A part positioned one inch away from the axis of rotation would have a displacement error equal to one inch times the sine of 0.0125 degrees.

This is likely a negligible error for most parts. Now consider when the feature being machined is 8 inches away from the trunnion axis.

For many applications, this level of error is unacceptable. So what can you do about this as a designer?
The first thing to do is recognize when you have a part that requires multi axis machining. Communicate to your machinist if there are cosmetic requirements or other features that require blending or alignment between different rotary orientations. The second thing to do is try to minimize the amount of tight tolerancing between features made from different approach vectors (ex: different 3+2 indexing positions). The third thing to do is be cognizant of the overall part size and plan for looser tolerances if multiple features must be positioned away from the rotary axis of the machine tool. In these instances there is no substitute for talking with your machinist directly because the machining strategy and machine choice may create tradeoffs that you cannot weigh in advance.
Thermal expansion
For parts with tolerances below 0.001”, thermal expansion can become a problem. As a designer you should understand the operating temperature of the part in use, and if necessary, specify or compensate for the temperature of the part in manufacturing. The classic case where this is important is on large press fit bearings. Take for example a 3” angular contact ball bearing designed to press into an aluminum bearing support block. The bearing manufacturer specifies a press fit interference range of 0.0002” - 0.0007” for reliable functionality. If the bearing will be installed at 70°F what would happen if the part was manufactured in a non-climate controlled facility at 55°F?
To understand this we can compute the change in bearing bore size using the thermal expansion coefficient of aluminum by applying the following formula.

In this case, a 15°F change in temperature results in a feature size change greater than the entire tolerance band recommended for proper bearing installation! Clearly this is an instance where temperature matters.
Design engineers should keep in mind thermal expansion when dealing with materials that have high thermal expansion coefficients, like aluminum, brass and copper, and when dealing with features that have positional accuracy requirements across large distances, such as dowel alignment holes between mating plates made from different materials.
Takeaways
Like many problems in engineering, designing parts for CNC machining machining is both an art and a science. As design engineers we have to exercise our engineering judgement without all of the facts. For CNC machined parts this means you might not know what machine your parts will be made on, or with what tools? Despite this lack of information it is always helpful to understand the first principles that drive CNC tolerancing and manufacturing errors in general. For many parts standard tolerances may apply, so services like Fictiv and Protolabs are a great, easy option. Sometimes your complete design intent or the subtlety of manufacturing a particular feature is not captured by a drawing and must be discussed with a machinist directly. Thanks for reading and good luck with your next build!
Five Flute - Next generation collaboration for hardware product development
If you are a design engineer or technical project manager and you want to design better products in less time, consider Five Flute. It’s the fastest way to share, review, and improve your engineering designs. From engineering drawing reviews to 3D design reviews of complex parts and assemblies, Five Flute is built for modern engineering teams that want to move faster without making mistakes.
Sources
CNC Accuracy
Proceedings in Manufacturing Systems, Volume 7, Issue 4, 201
MATEC Web of Conferences 157, 01006 (201
Tool Holder Models
Drumhead Vibration Modes
Youtube: normal modes of circular membrane vibration

