Fastener selection
As mechanical engineers, we deal with fasteners on almost every project. For machine design applications, picking the right fasteners and choosing how many to use can be challenging. As with most problems, you can really benefit from stepping back and listing out your requirements. Here at Five Flute we like to make a requirements project and use issues to sketch out a quick list of design requirements. For bolted and riveted joints, this won’t take long, but will be enormously helpful.
Slow down, think about requirements
So what are requirements for a bolted joint?
At a minimum you should be thinking about the following: What is the purpose of the fastener in this application? What loading conditions do I expect the joint to experience? What drives the design: Static strength? Stiffness? Fatigue? What is the worst case scenario? What is the target safety factor? What materials are present? Should corrosion be considered? Should thermal stresses be considered? How will it be assembled? Does it need to be taken apart or serviced? How long does it need to last? How much will it cost?
Individual applications may require other considerations, but taking 30 minutes to think through the above questions can keep you working efficiently as a designer.
Materials
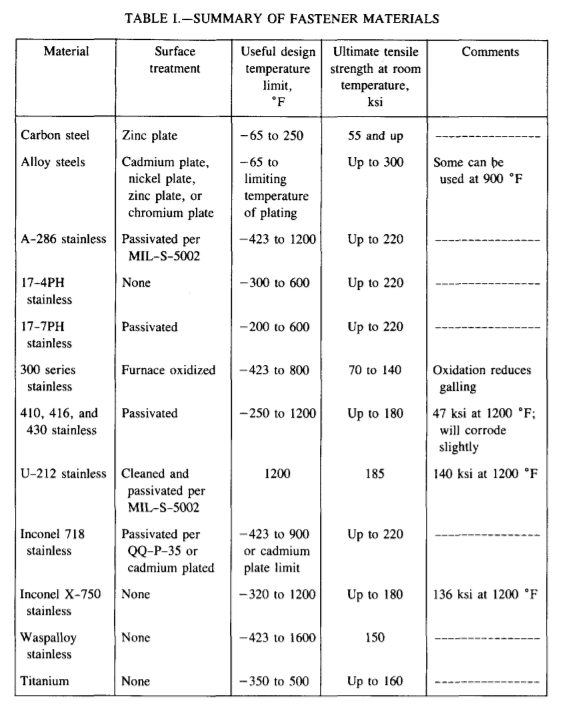
The primary drivers of bolt material selection are strength, corrosion resistance, temperature environment and cost. For the vast majority of non-aerospace applications bolts are typically made from carbon, alloy or stainless steels. In low temperature, non corrosive environments low carbon steel is favored for its low cost. As carbon content increases above 0.25%, steels can be heat treated to significantly higher strengths at the cost of a loss in ductility. Keep in mind that uncoated steels will eventually rust in open air. This includes the common black oxide coating, which typically has a thin oil film that can delay oxidation for a very short period of time (on the order of days). The other common coating for low carbon or alloy steel bolts is zinc plating, which helps limit corrosion in wet environments. Zinc plating has the unique property that it will migrate to areas that have been scratched in a “self healing” manner. It is however a sacrificial material and will not last forever in highly corrosive environments. The following table (adapted from the NASA Fastener Design Manual) is a useful reference guide relating fastener materials to coatings, temperature and strength at room temperature.
Design Guidelines for Bolted Joints
Bolts are ubiquitous in machine design and product engineering, and the vast majority of use cases will not require in depth analysis. However, for those cases where safety factors are lower due to strength, weight or other requirements, or where exact preload must be achieved, bolted joint design can be extremely difficult. Hand calculations can be challenging to reason through, and finite element models can be way off if not setup with proper inputs. Because of the complexity and unique nature of bolted joint design, many fastener related failures occur in the field. General Motors recalled approximately 500,000 vehicles across seven models (Impala, Camaro, Equinox, GMC Terrain, Cadillac SRX, Buick Regal and Lacrosse) in 2014 due to fastener related problems(2). Even the new eastern span of the San Francisco-Oakland Bay Bridge had a complex fastener related problem (hydrogen embrittlement) shortly after construction. \
Due to this complexity, we cannot possibly cover all design cases thoroughly in this post. However, in our experience the following design guidance can arm engineers with a basic joint design toolkit, an understanding of what to look out for when designing, as well as orient engineers to the areas of complexity that must be investigated further (empirically, or with nonlinear contact FE models).
Design for Shear Transfer Through Friction
In most cases it is best practice to design a slip-critical joint. This means that the bolts in the joint generate sufficient clamping load across the joint such that the shear through the joint is transferred through the joint member faces, not as direct shear through the fastener itself. This may seem obvious, but it is worth reiterating: bolts are designed to develop clamping loads between two or more components. Implicit in this statement is that bolts are not designed primarily to act as shear pins or in bending. For this reason, ensuring the proper preload across a bolted connection is especially important. As engineers, it is our job to understand and control the loading conditions across structures we design and assembly plays a large and often undervalued role in this.
To demonstrate the differences in loading condition as a function of bolt preload we can look at a double lap joint secured by a single bolt. The figure below illustrates the approximate stress flow in this joint with and without a preloaded bolt.
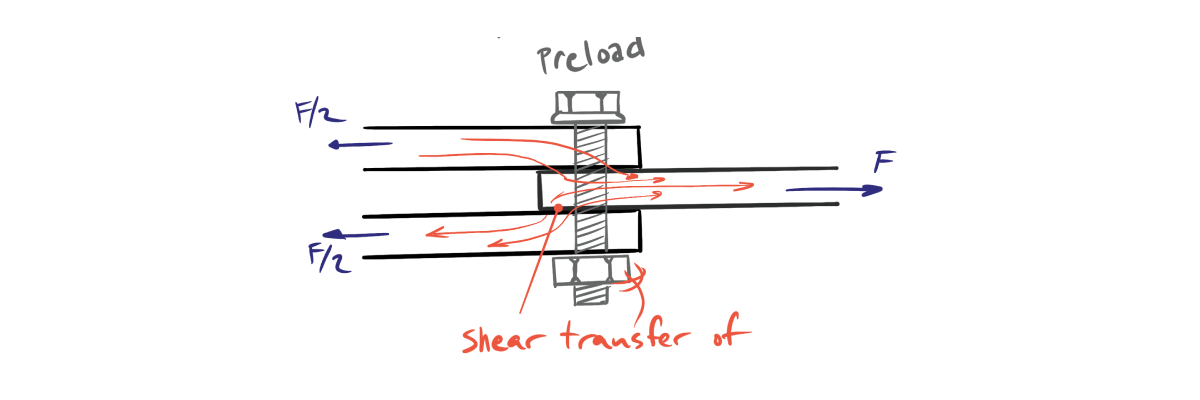
Stress flow in double lap joint with preload
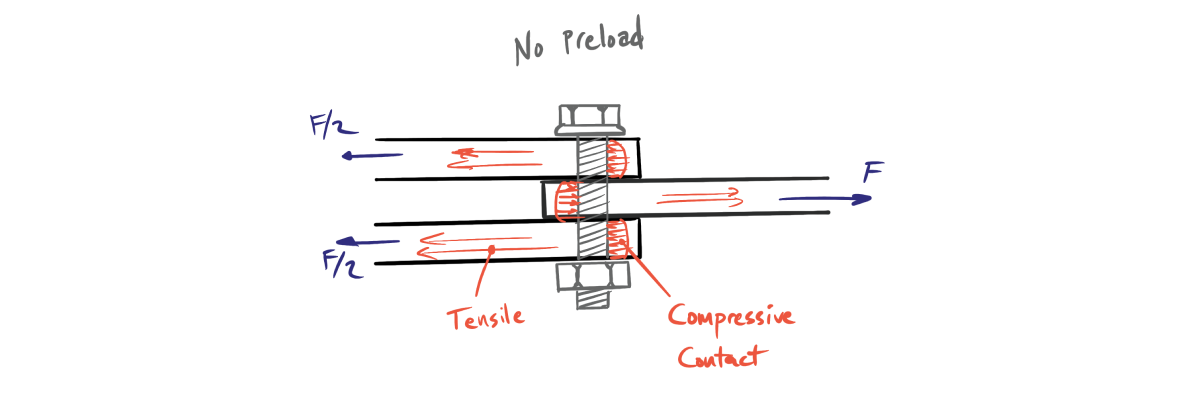
Stress flow in double lap joint without preload
There are three primary disadvantages of the no preload condition illustrated above.
- Contact Stress. Hertzian contact stress at the bolt-plate interface will be distributed across a much smaller surface area than the shear overlap of the joint, leading to large stress concentrations. In soft materials this can lead to “wallowing out” of the plate as stresses redistribute below yield.
- Bolt Loading in Shear. Instead of predominantly tensile loading in the bolt, load is transferred through shear at the joint overlap planes. As the connection gets sloppier, more bending moment is applied to the bolt, causing tensile stress directly across the thread notch. So what is so bad about loading through shear you might ask? The key to understanding this is to apply Von Mises failure criterion to relate yield stress to shear stress. From this we can estimate that shear strength is equal to approximately 58% of yield strength (this varies based on fastener material). Obviously this results in a weaker joint, even when ignoring stress concentrations and bending.
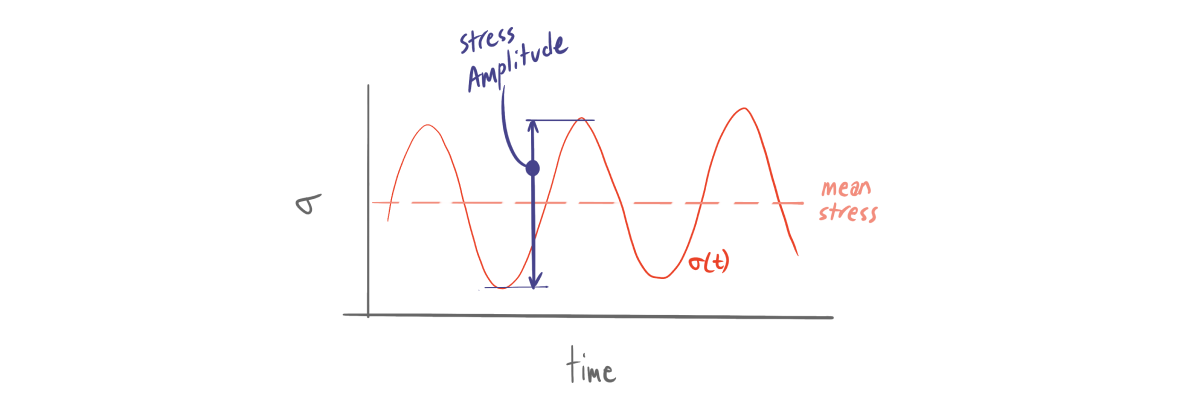
- Fatigue Considerations. From a bolt fatigue life perspective, having very little preload is a disaster waiting to happen. A properly preloaded joint does not induce cyclical loading in the bolt when cyclical structural loads are in the radial direction of the bolt. Yes that's right, zero cyclical loading. With no preload, the bolt will see fully reversed shear and bending loads when loaded cyclically. Fatigue life is predominantly impacted by stress amplitude more than mean stress. So although preloading a bolt may drastically increase mean stress, it can sometimes eliminate stress amplitude entirely. The figure below illustrates the difference between mean stress and stress amplitude.
When fatigue life is a concern, be sure to design in a target preload across the joint, communicate that preload by documenting required bolt torques, and develop QC procedures to validate that the proper bolt torque was achieved.
Stiffness Matters
Remember that all mechanical components behave like springs, and their relative stress response under loading conditions is driven by the relative stiffness of each component. This is a particularly deep topic that we won’t be able to cover fully in this post, but we can distill some fundamental guidelines and uncover problems that you should be on the lookout for.
To illustrate the importance of bolt and member stiffness, we can use a simple springs-in-parallel model as illustrated below.

With two springs (of different stiffness) mounted in parallel, the amount of load each spring generates for a given displacement (delta x) is proportional to the individual stiffness in each spring. Nothing groundbreaking here, just Hooke’s law.
Now apply this same reasoning to a bolted joint with a pattern of fasteners of varying grip lengths and diameters. The fasteners with shorter grip lengths and larger diameters will take more of the axial loads when clamped members are displaced. This means that varying stiffness across fasteners leaves the stiffest fasteners more susceptible to overload in certain conditions.
A useful guideline for bolted joints is to try to maximize the stiffness of the joint members (things being clamped) and both equalize and minimize the stiffness of the fasteners used for a given target preload. Minimizing fastener stiffness may sound like counter-intuitive advice, but it helps to think about the impact of member displacement and vibration across fasteners. Again, for a given preload, a joint with more compliant fasteners will see less variation in preload when clamping members are displaced. This joint will also see a more equal distribution of axial loads in fasteners when loaded dynamically, thereby sharing loads more uniformly and reducing local failures
Fastener patterns and positions
As engineers we design bolted and riveted joints that include multiple fasteners. The fastener positions are often patterned uniformly because of the ease of developing simple linear patterns in CAD programs. In situations where installed stiffness is critical, or factors of safety are lower, more care must be put into faster layout. Always remember that the position of fasteners relative to the applied load dictates how much of that load is carried by each fastener. This is the fundamental reason we recommend maximizing member stiffness in the previous section. A stiff component being bolted down will transfer load more evenly among a given fastener group, independent of fastener position.
There are a few key failures, discussed below, that result from improper fastener layout relative to applied loads.
Unzipping
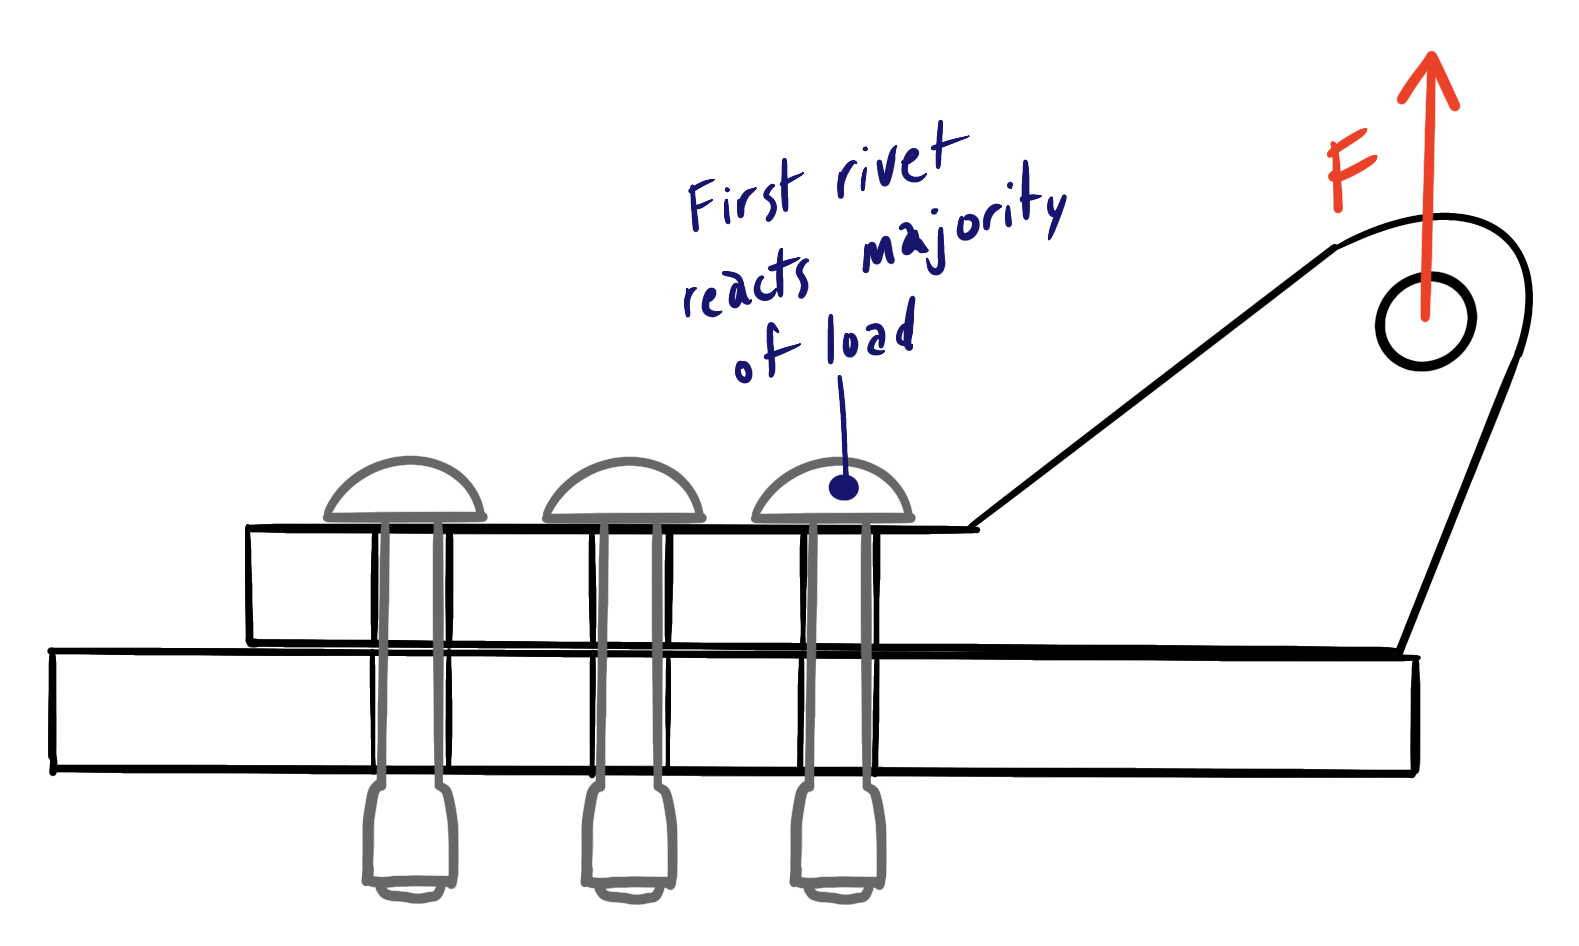
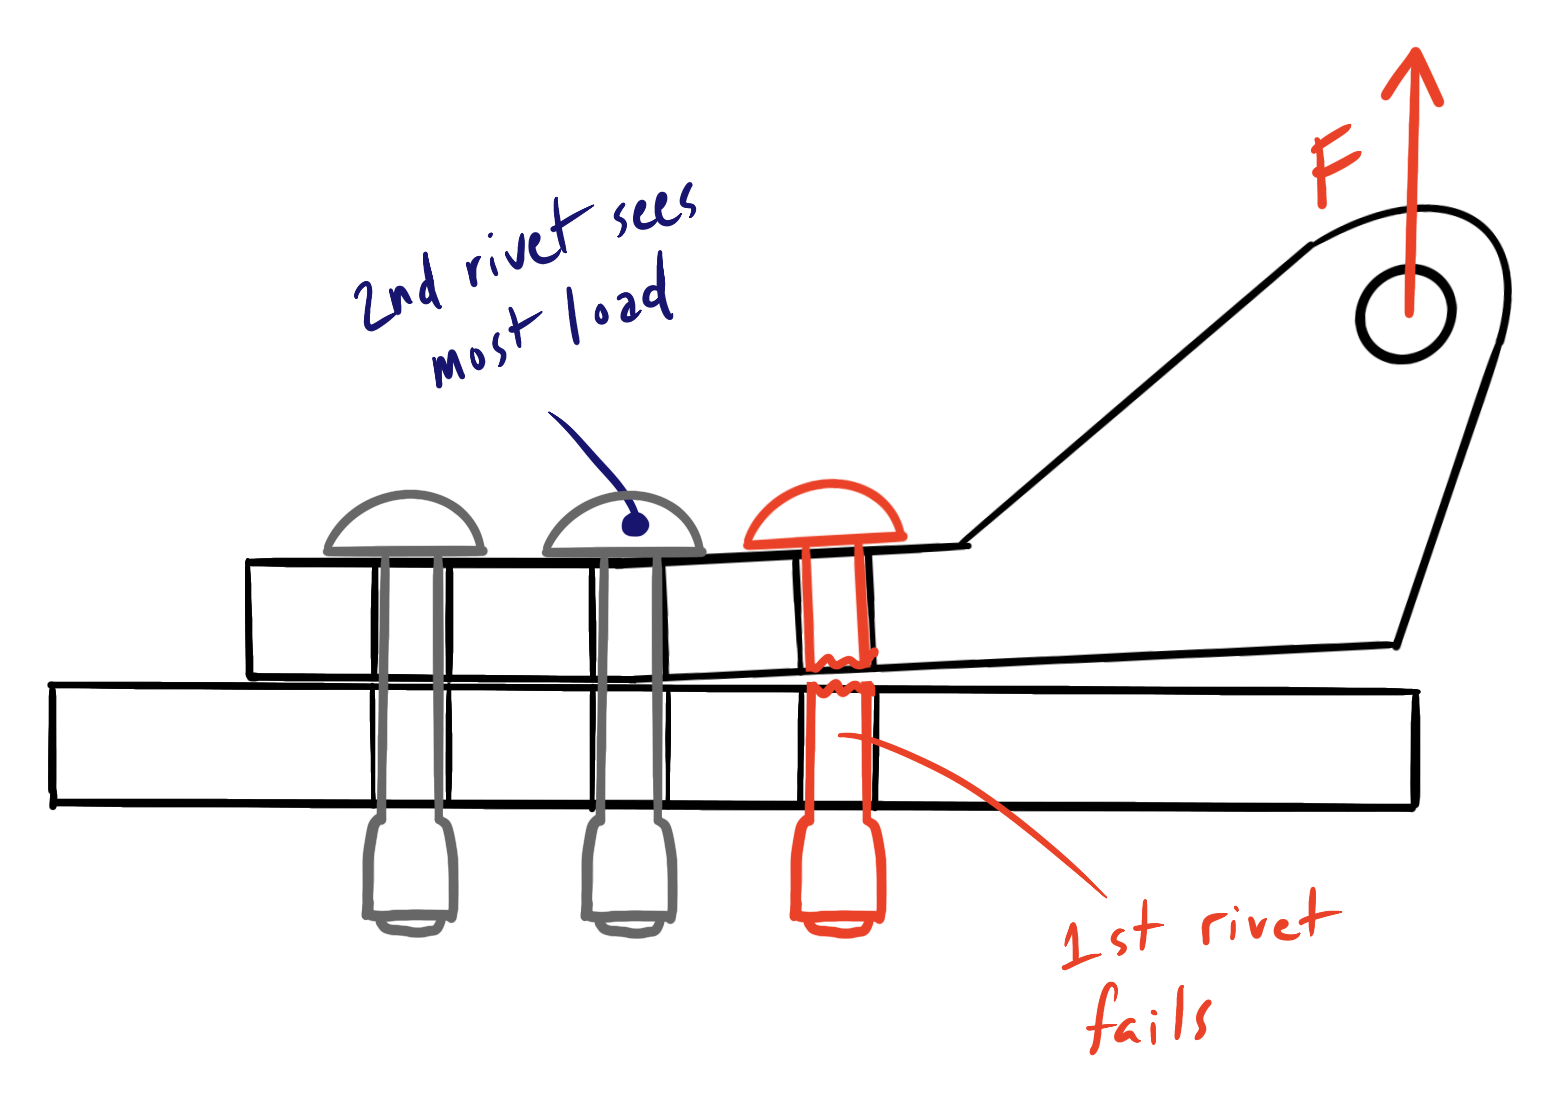
Unzipping is an axial failure mode whereby a fastener in close proximity to the applied load bears the majority of the load. The failure of this fastener causes load to be transferred to the next closest fastener, which will may also fail unless loading is reduced. As illustrated below, this failure pattern can proceed down a line of fasteners causing a failure cascade, effectively “unzipping” the joint. Note: the illustrations below show rivets, but the failure modes are also a concern for bolts and screws.
Unbuttoning
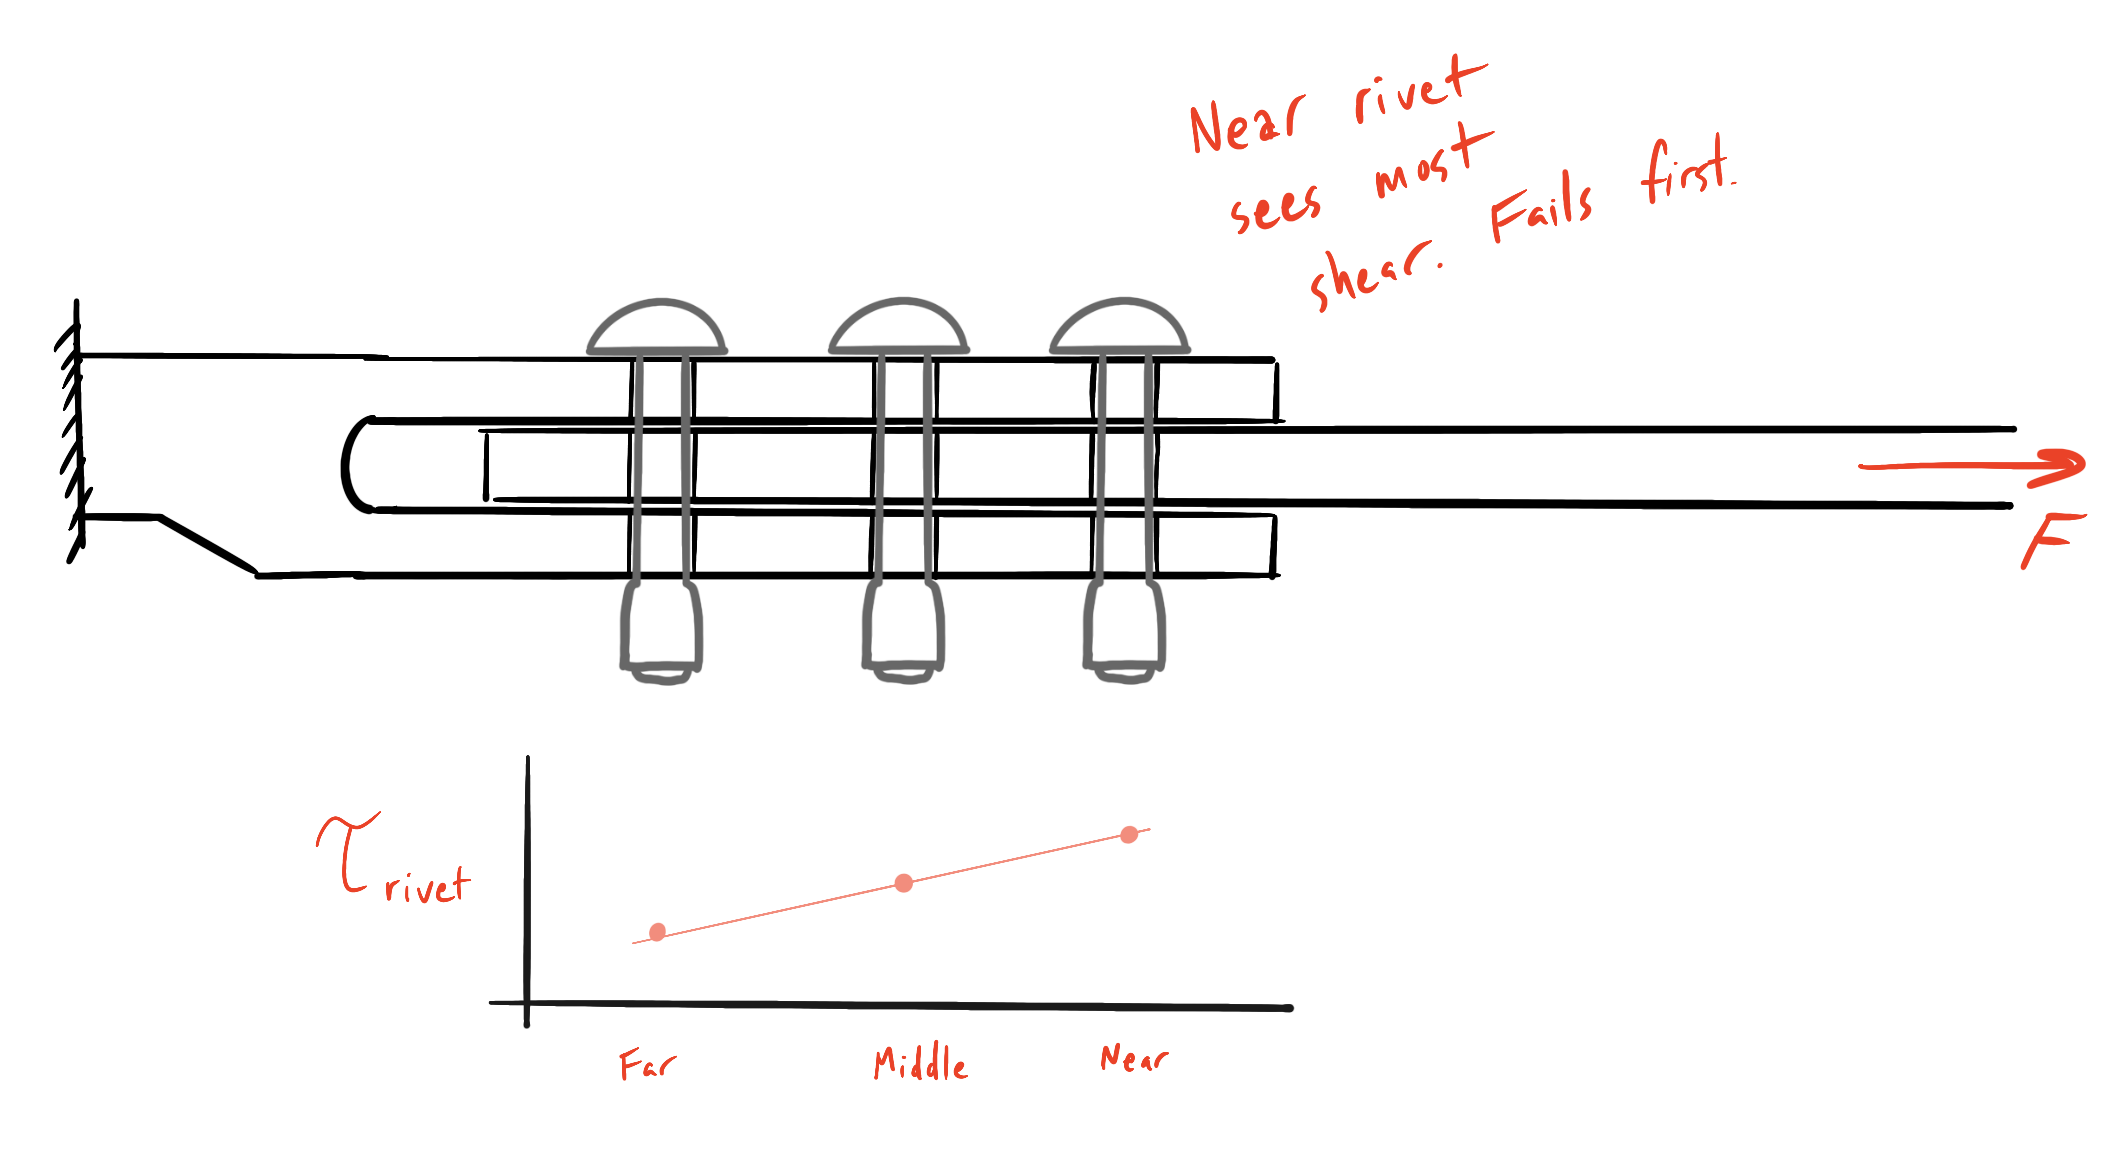
Unbuttoning is similar to unzipping, but is caused by shear loads (radial relative to the fastener). Again, the layout of fasteners and the stiffness of the clamped members is such that a fastener in close proximity to the applied load bears the majority of the load, in this case shear. The figure below illustrates the conditions leading to unbuttoning failure.
Galvanic Corrosion
When using bolts and joint members made of different materials, galvanic corrosion can be an issue. For prototypes with short lifespans, this is rarely a problem, but solutions should be considered for production assemblies with long anticipated lifespans or harsh environmental exposure (ex: marine products). The best solution is to electrically isolate dissimilar materials from each other, either through paint, powder coat, insulating washers, plating and other surface coatings like anodizing. In instances where this is not possible, the surface area of the anode material should be minimized. In high moisture environments and especially salt water environments insulating methods become essential.
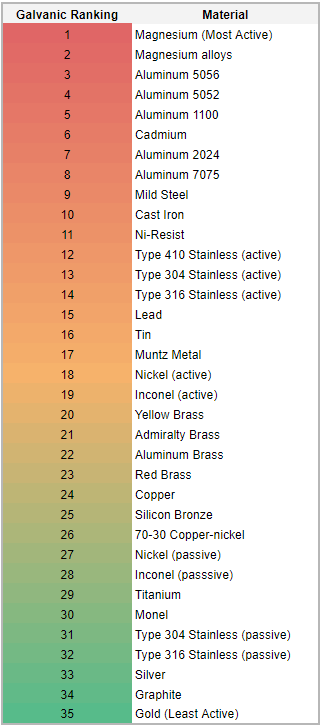
Keep in mind that different materials will have different galvanic potential. It’s a good idea to know what material is acting as the anode and what is acting as the cathode. Material will flow from the anode (most active material) to the cathode (least active) in any galvanic cell. For reference a galvanic ranking of common materials is included below, ranked from most to least active. The further apart two materials are in this list, the more galvanic potential difference they have.
Bolt Preload
Proof load
How much torque can a bolt take? Like all other mechanical components made from ductile materials, bolts have a yield strength. Assuming the nut or threads that a bolt is mating with are strong enough, it is possible to torque a bolt until it tears itself apart. Obviously this is suboptimal for the vast majority of cases, so we can rule out tightening until yield as a good design and assembly practice. This begs the question, how much less than the yield load should we target for our fasteners?
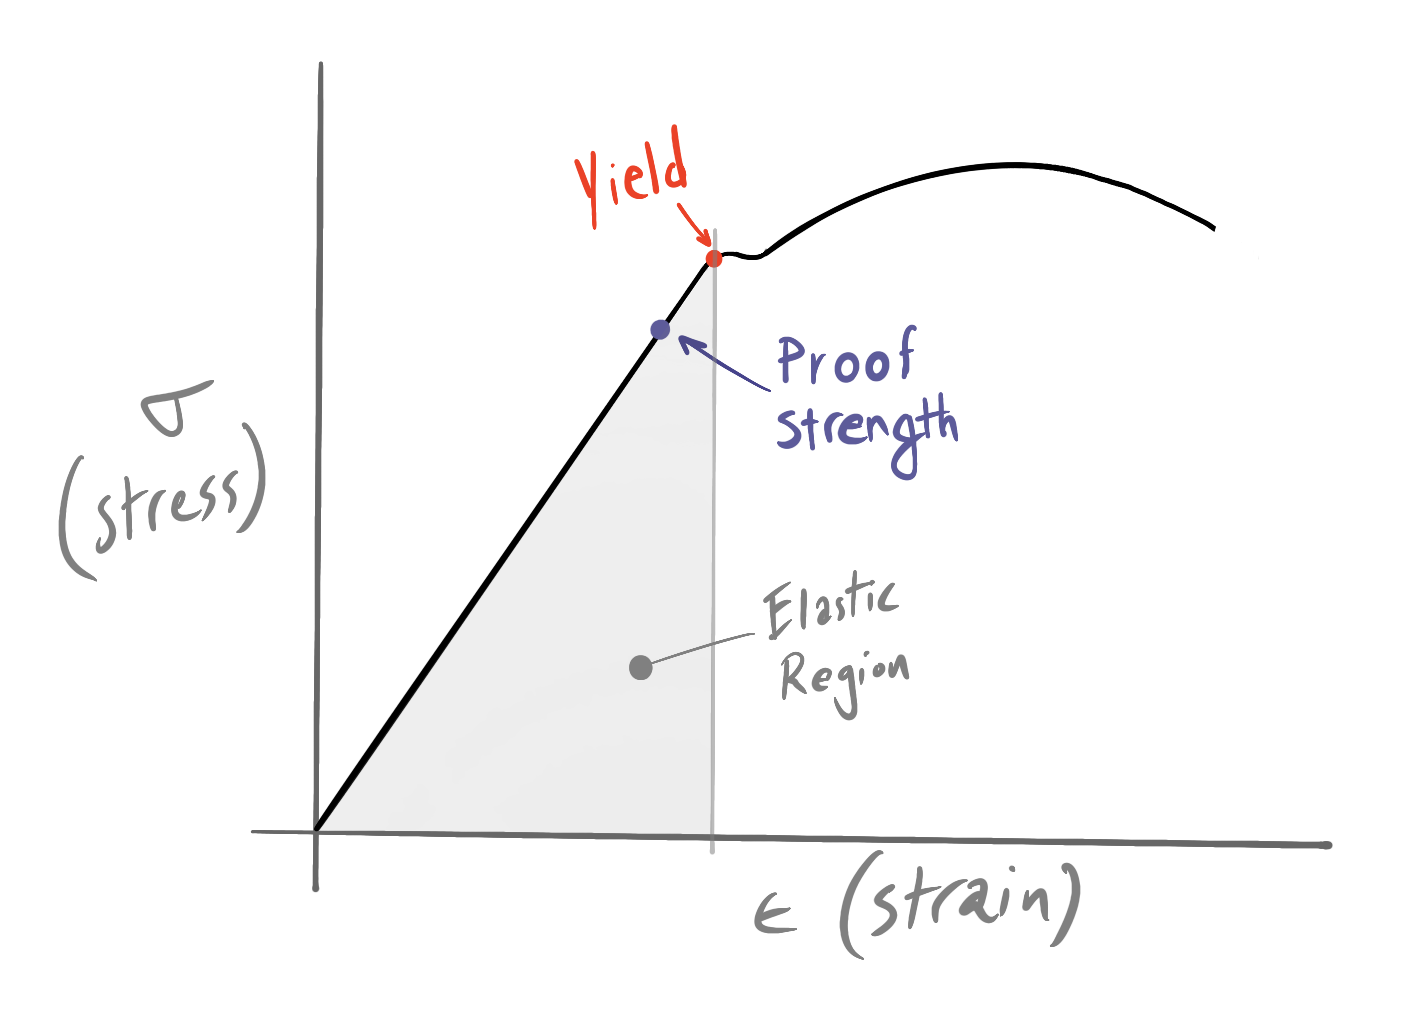
In order to prevent over-tightening, manufacturers often publish proof loads or proof torque charts for their bolts. Proof load is the maximum load a bolt can take without any elastic deformation. Proof load is typically in the range of 85% - 95% of the yield load. Proof load represents the absolute upper limit that a fastener should be subjected to. The illustration below shows a typical stress-strain curve for a ductile material (ex: low carbon steel) along with yield stress and proof stress indicated on the curve.
Why not Proof Load?
If we generally want to design slip-critical joints and more clamping force helps transfer shear, then why don’t we always use proof load? The answer is that in addition to fastener forces, joints will also be subject to static and dynamic external loads. These loads can impart axial, radial, torsional and bending loads onto fasteners. If proof load is always used, and additional axial loads are applied to the fastener, it is more likely that yielding will occur because the fastener has no stress headroom or safety factor in that loading condition.
This leaves us with perhaps the most difficult problem of any bolted joint design; determining the optimal preload and associated torque for each bolt in the joint. We know the optimal preload for a bolt is somewhere between zero and proof load, but how do we determine it exactly? The answer lies in balancing the mean load due to preload, and the dynamic or cyclical load due to external forces across the joint. We can visualize the impact of mean load and cyclical load alongside the stress strain curve.
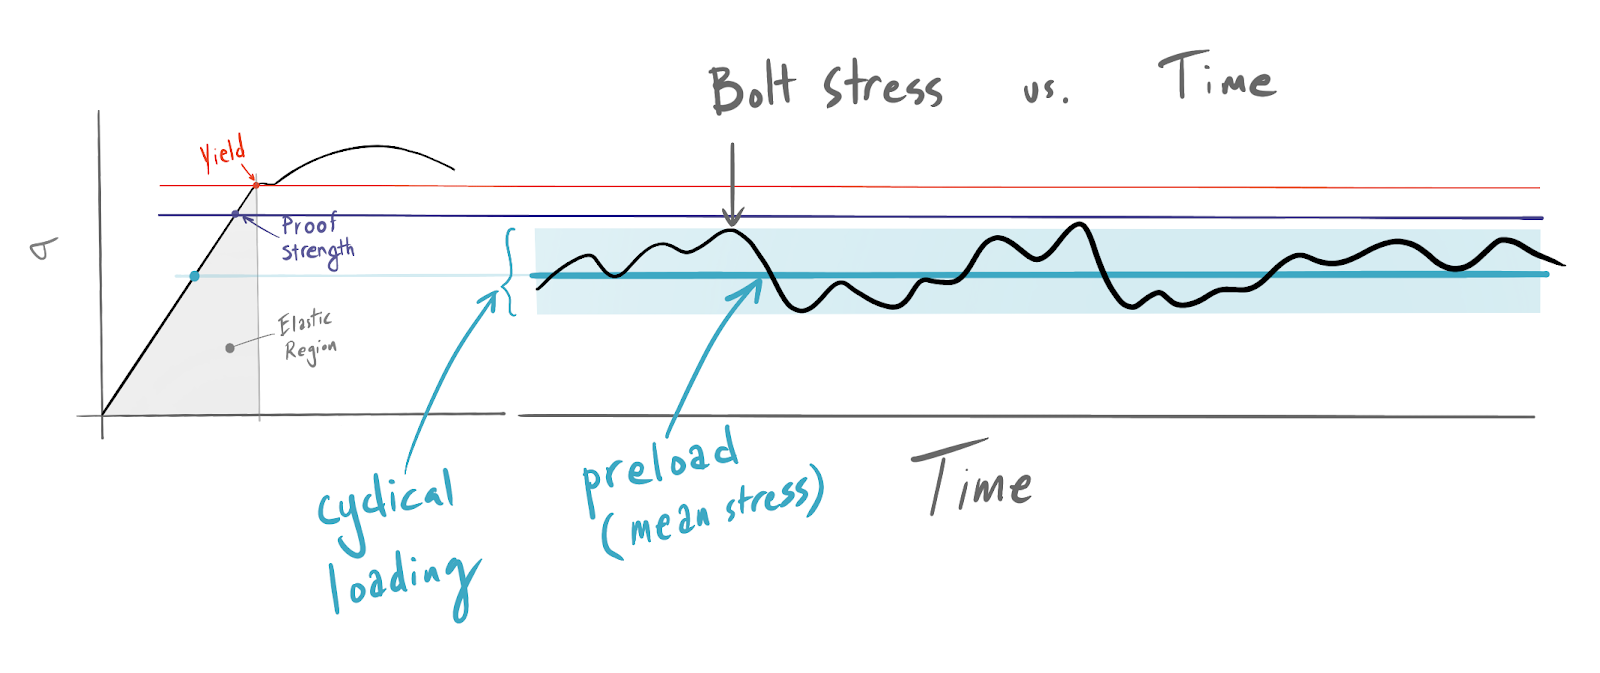
In the above example, a preload is chosen such that the cyclical loading experienced by the fastener does not exceed the proof strength. Visualizing the proper solution is trivial, but finding it can be quite difficult when you add in additional design constraints (ex: weight, stiffness, etc...).
Choosing the proper preload
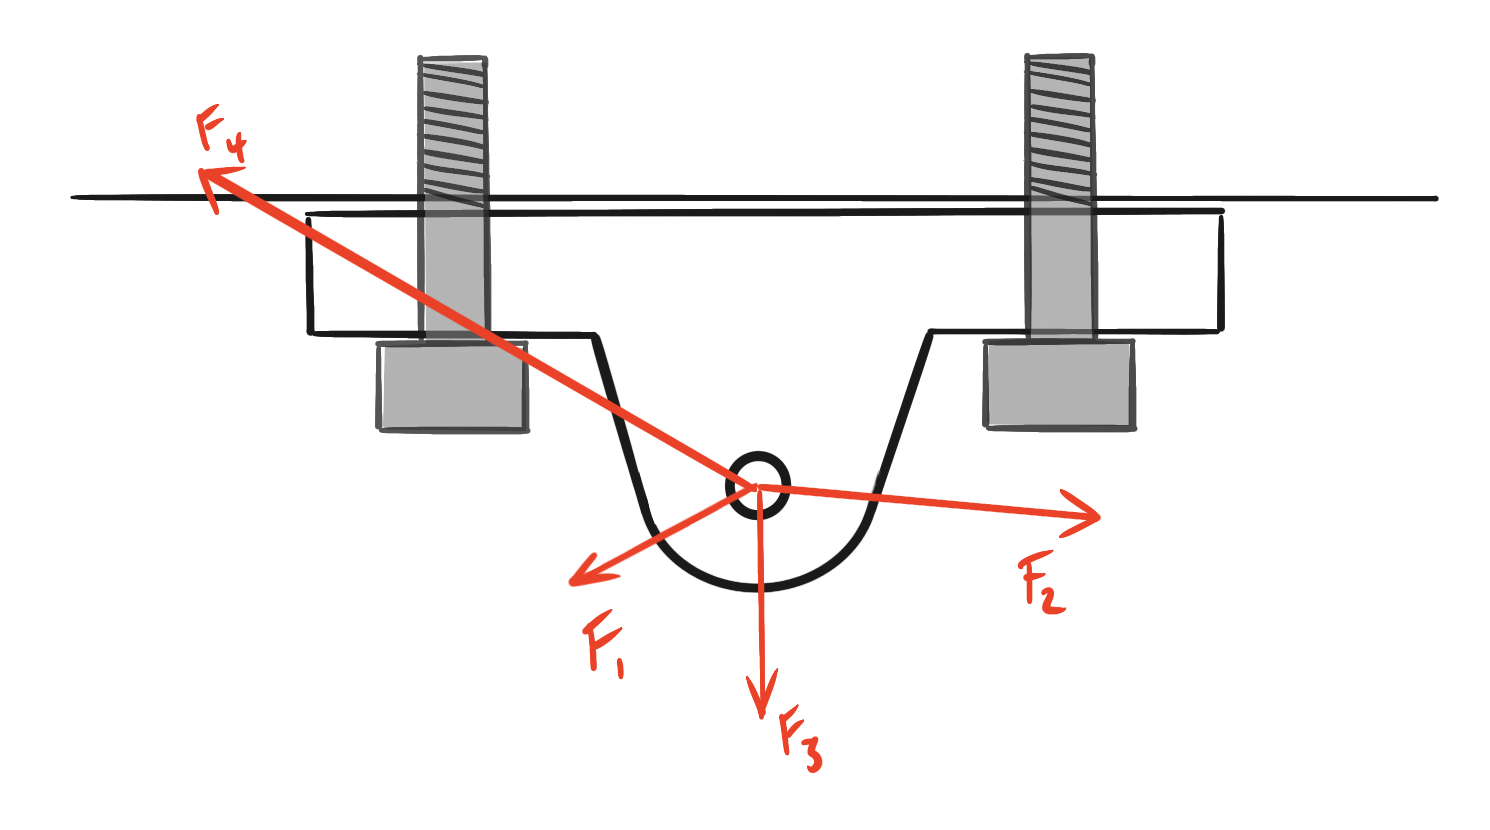
Determining the proper torque and preload for a fastener is the most difficult engineering problem of any bolted joint design. Usually this is an iterative process which involves creating a joint design, selecting a fastener and fastener layout you think will work (sometimes based entirely on feel), running some analysis, and iterating on both fastener selection, layout and preload. Loading conditions can impact the difficulty of the analysis significantly. A few cases worth noting are discussed below along with simple illustrations to clarify load direction relative to fasteners and joint members.
- Static axial loading only. Generally this is the simplest load case. With no shear loads into the joint, the design problem usually boils down to selecting fasteners that are big enough to handle a small initial preload plus any additional static loads.
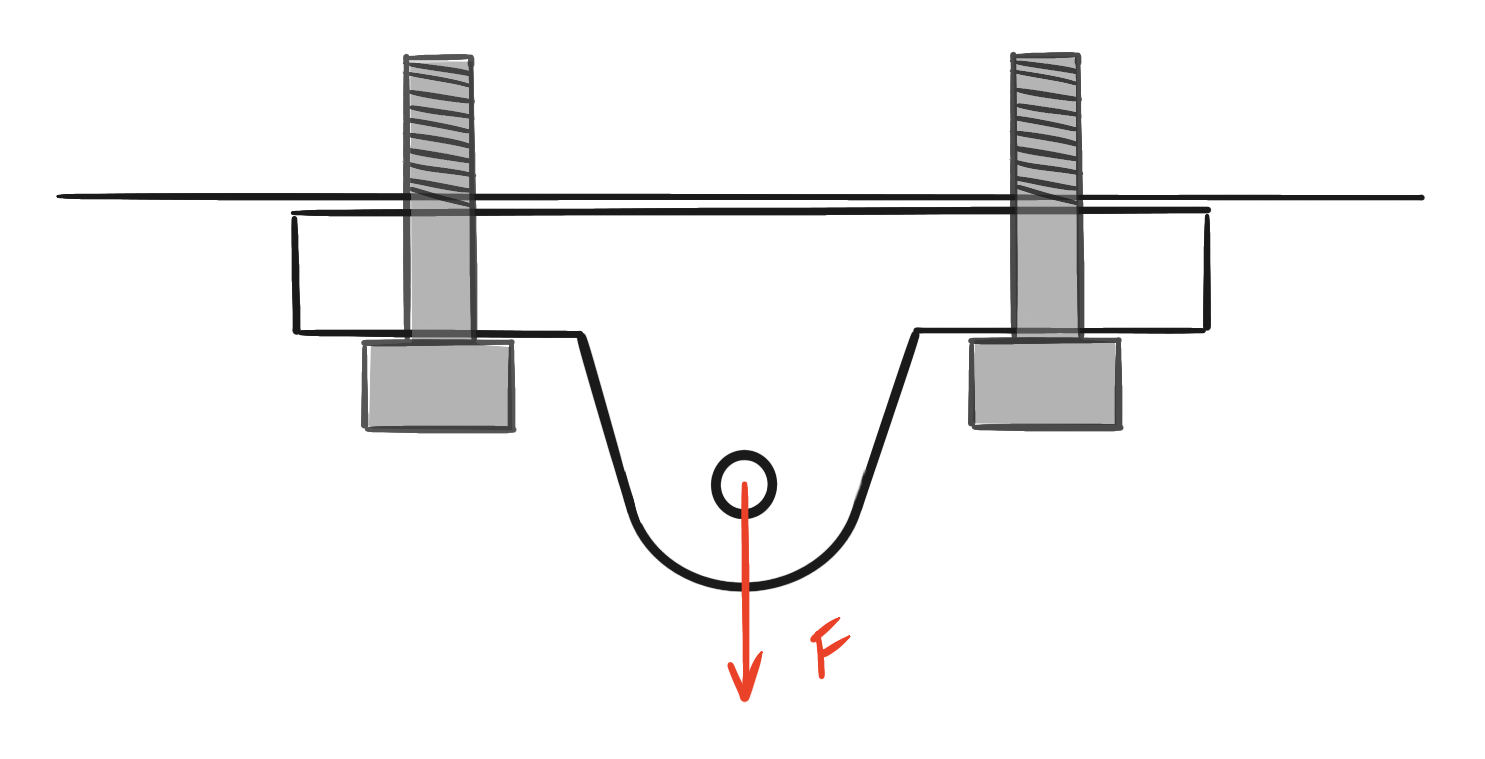
- Static shear loads. Similar to the previous load case, but friction coefficients in the joint members must be considered. Again the goal is to design in a preload such that shear transfers between joint member faces and not through bolt shear.
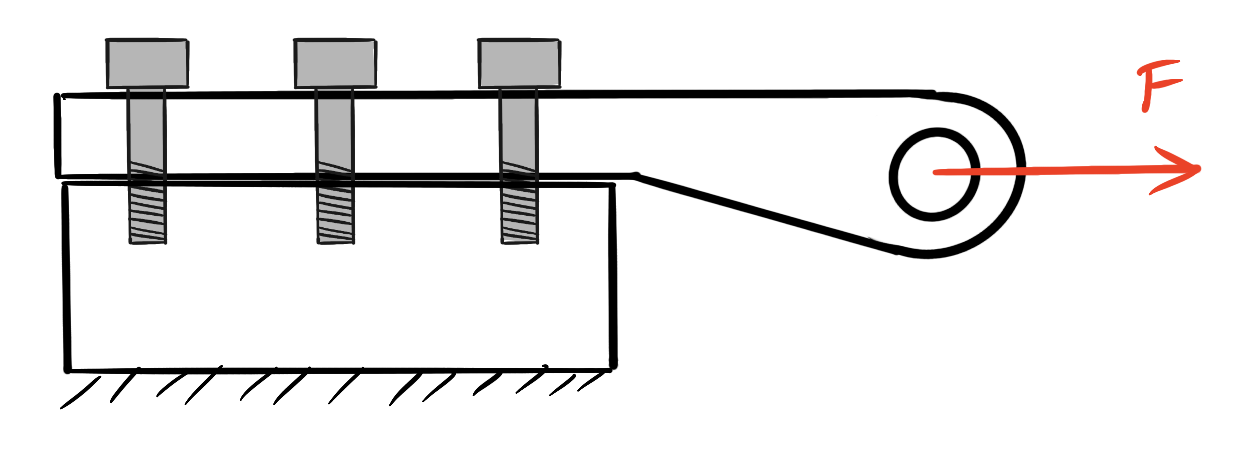
- Combined static shear and axial loading. Essentially a combination of the above loading conditions. Preload must be determined by factoring in the axial load. In some instances the axial load will be in the clamping direction, thereby increasing the joint’s resistance to shear load without slippage. In other cases the axial load will tend to pull the joint apart, reducing effective preload. In this case you must factor in the fastener stiffness and the joint stiffness in order to compute the actual preload after the axial load is applied. You must then check that this preload is sufficient to resist any additional shear loads into the joint without slippage.
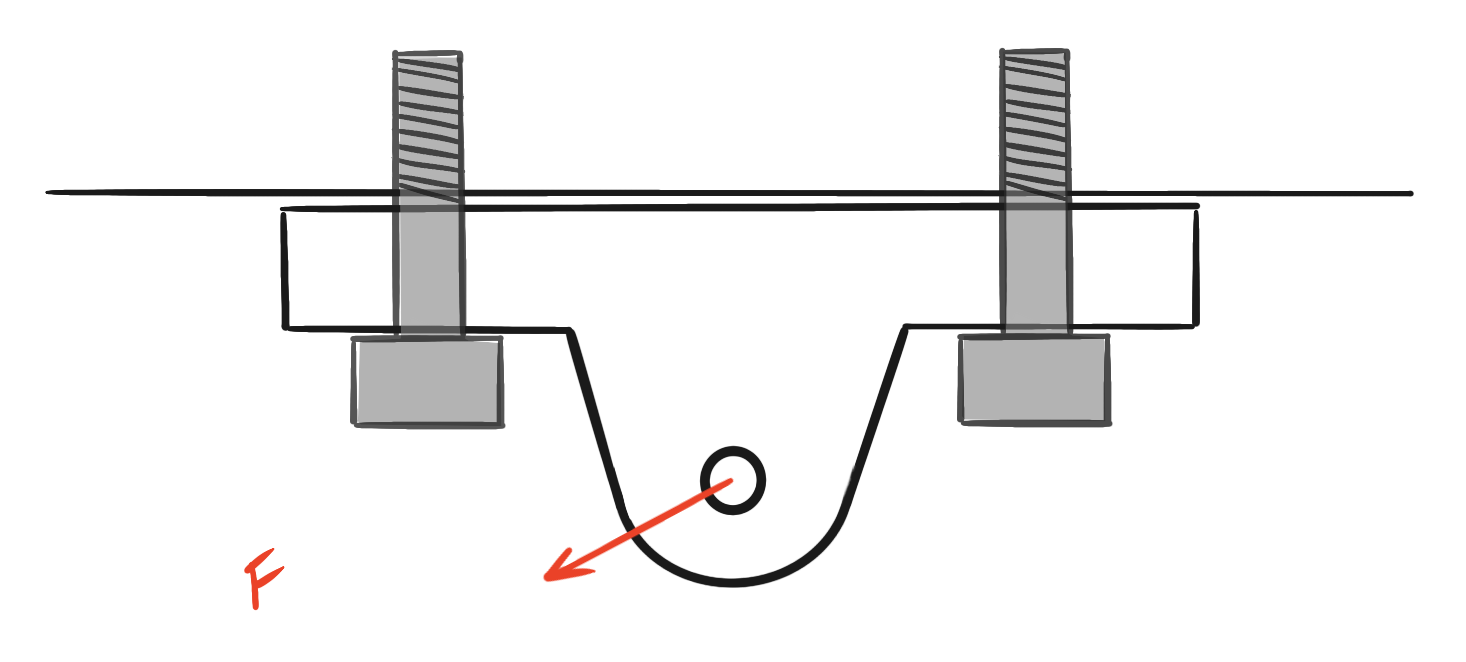
- Combined dynamic shear and axial loading. With varying shear and axial loads, you must determine what the worst case scenarios are in your expected load range. The analysis problem is similar to the previous case, but there may be multiple worst case conditions with different failure modes (ex: joint slippage vs fastener overload).
Bolt Preload Methods and Torque Error
Once the target preload is known, the correct amount of torque must be applied to a bolt to achieve this preload. There are a number of methods for achieving the bolt preload and each method has some amount of error. The NASA Fastener Design Manual has a very helpful chart that lists the error associated with various preload application methods. Surprisingly, a torque wrench is only ±25% accurate!
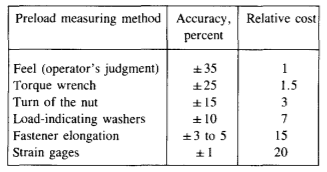
Note: It may be necessary to include the torque error as preload error in your loading conditions. Because the torque error is likely to be symmetrical, you can use root sum square or other statistical methods (Monte Carlo) for summing up torque errors across multiple fasteners on a joint. If you are dealing with a single fastener, preload error should definitely be considered. If you are dealing with a 10 or 20 fastener pattern, you may be able to neglect error entirely as it is stochastic and should balance out across the joint.
Computing Torque from Preload
When using torque control to apply preload, the coefficient of friction between the bolt and the nut is especially important. Lubrication on bolt threads can cause large decreases in friction, resulting in more bolt elongation and preload for a given torque. Again referencing the Fastener Design Manual we can use the following formula for computing bolt torque.
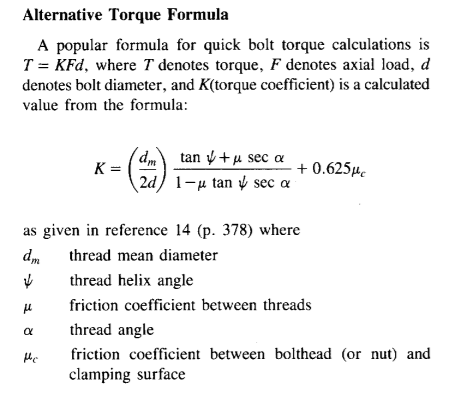
Torque coefficient K can be determined with the following chart.
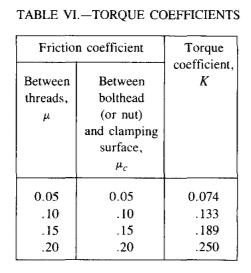
In all cases, you should look at the materials in your joint and choose conservative values for coefficients of friction along with the appropriate preload application method for your factor of safety.
Rivets vs. Bolts
Rivets and bolts perform similar functions, but you should not think of them as interchangeable. Rivets have a few key differences highlighted on the table below.
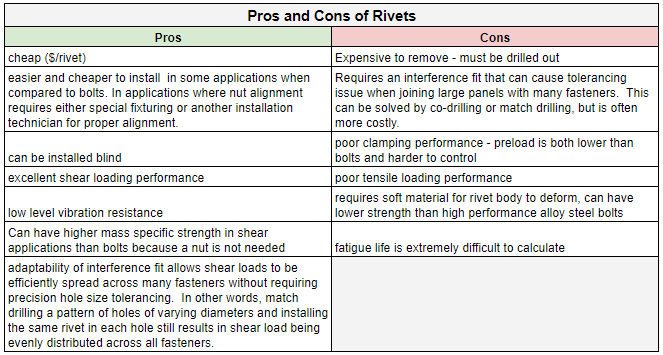
In general rivets should be used in sheet metal applications with both large patterns of fasteners and predominantly shear loading.
Rivet Joint Failure Modes
Because rivets are often joining sheet materials, there are a variety of failure modes to consider. As a design engineer you should be familiar with each failure mode illustrated below and understand the failure criterion governing each mode. A detailed analysis of each mode is beyond the scope of this post, but both Shigley’s and Roark's Formulas for Stress and Strain are useful references for understanding these failures.
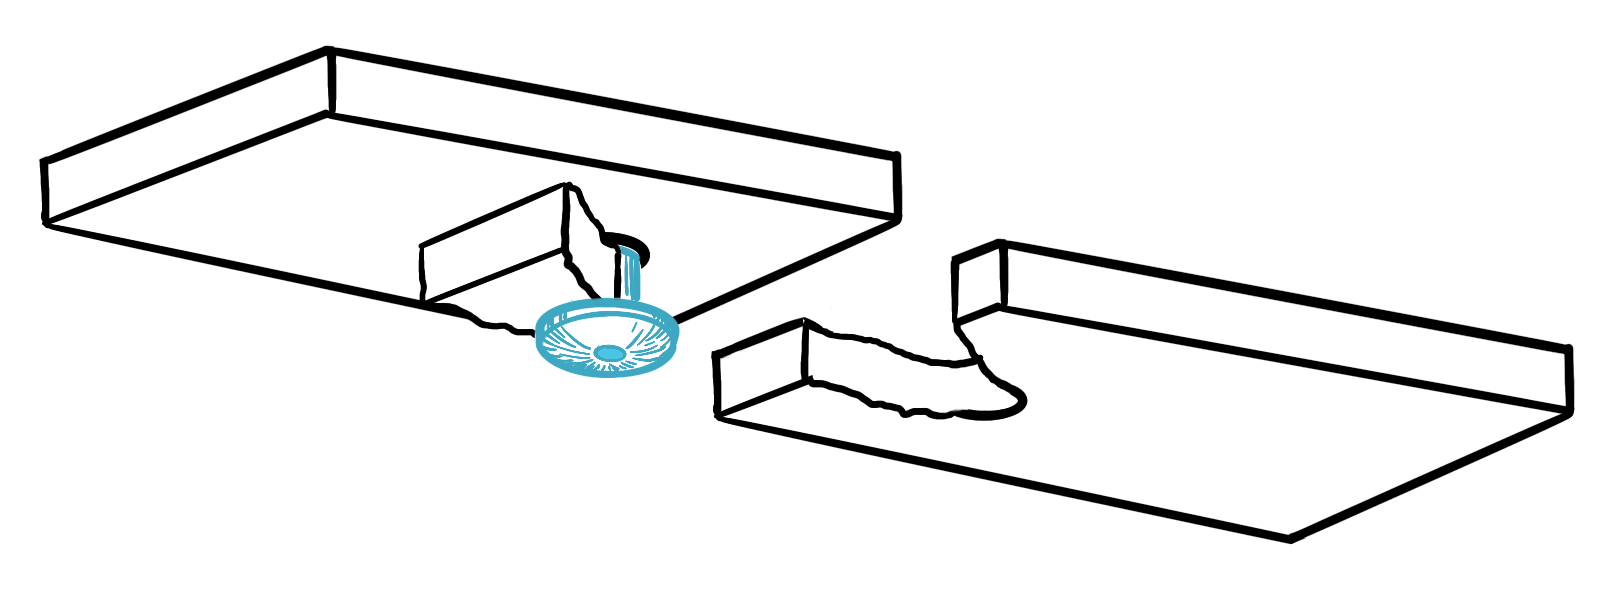
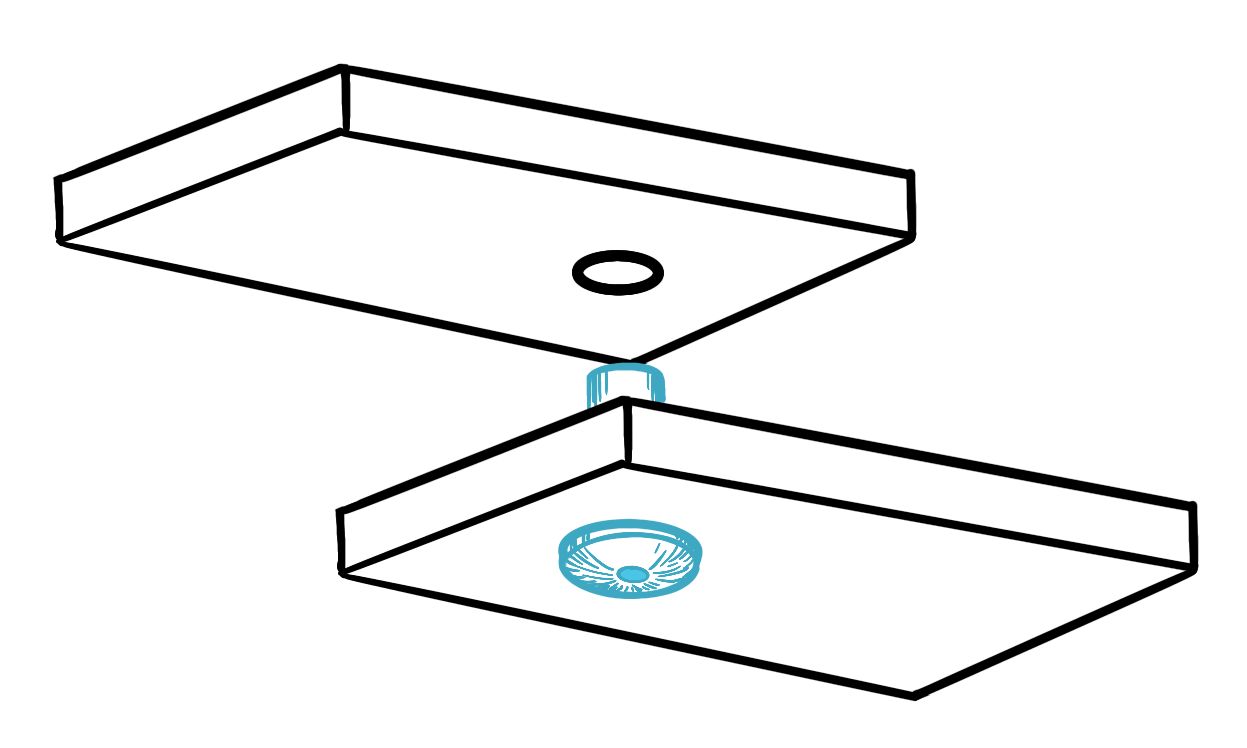
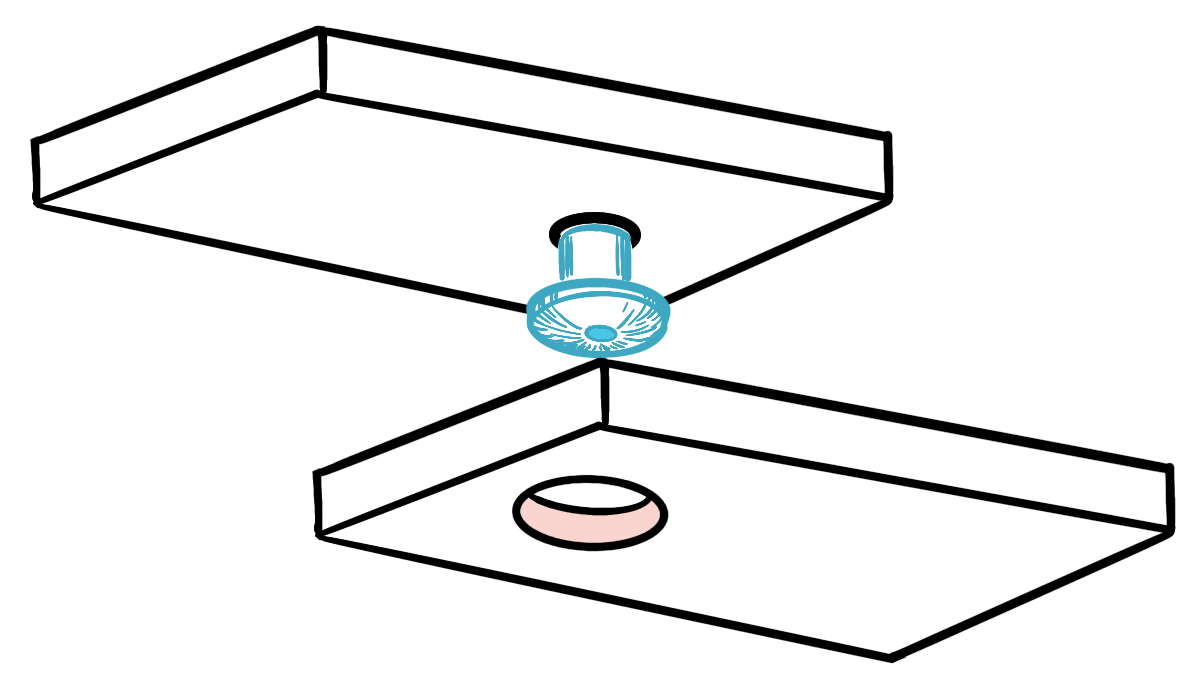
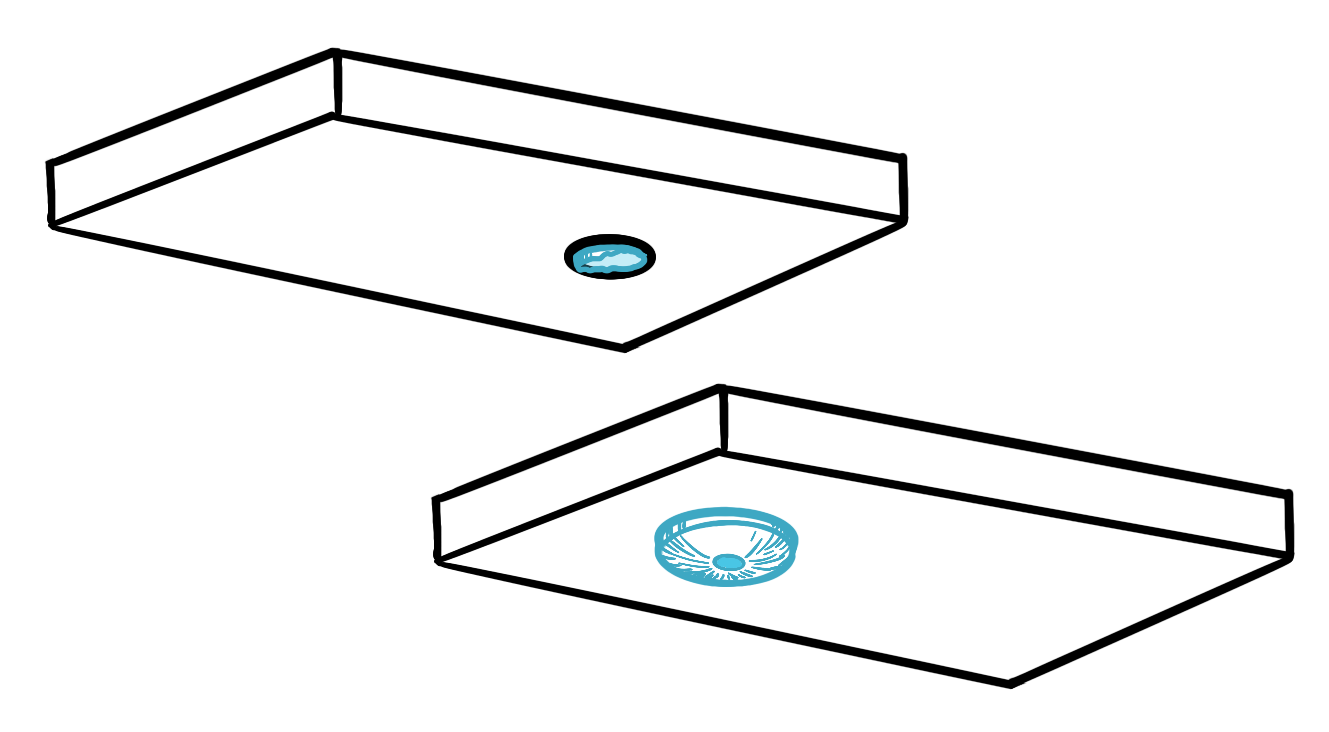
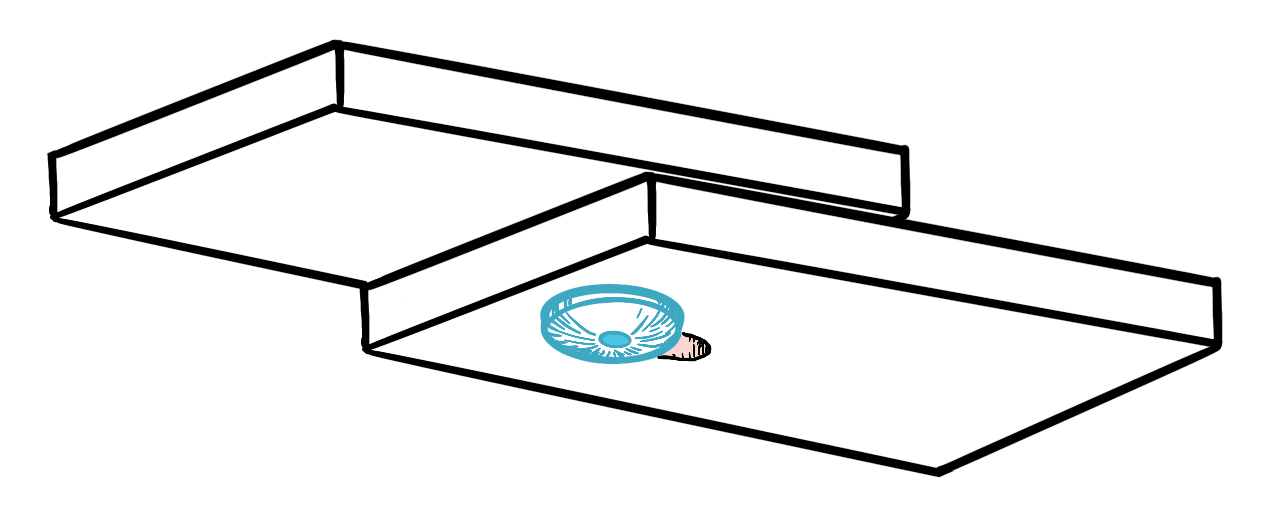
Rivet joint failure modes. Starting in the top left and moving clockwise; sheet tear out, rivet pull out (non-head side), rivet pull through (head side), rivet shear, sheet deformation
Tensile vs Shear Loading Case Study
Although some types of rivets (hot driven button head rivets used in structural steel construction) perform well in tension, it is generally advised that rivets should be loaded primarily in shear. To understand the importance of controlling loading conditions on rivets we will look at two simple bracket designs with a bearing load applied to an eyelet on the bracket.
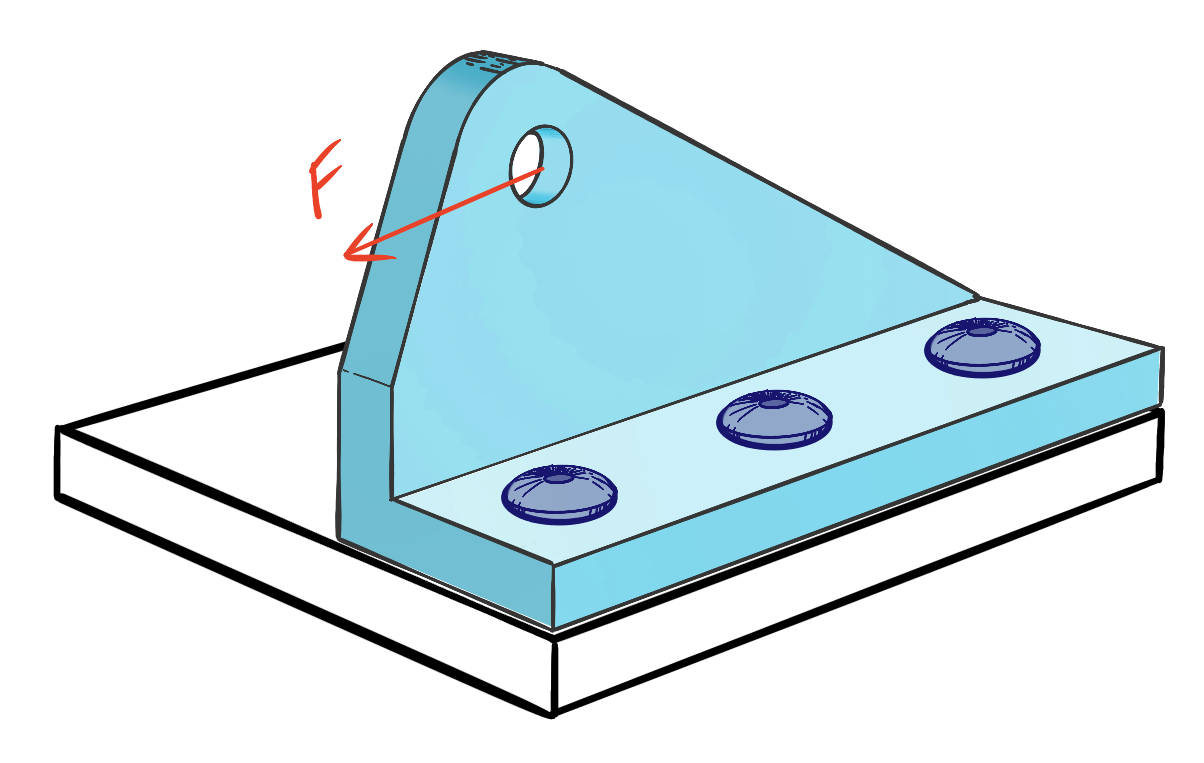
Design 1: Angle bracket with tensile loaded rivets
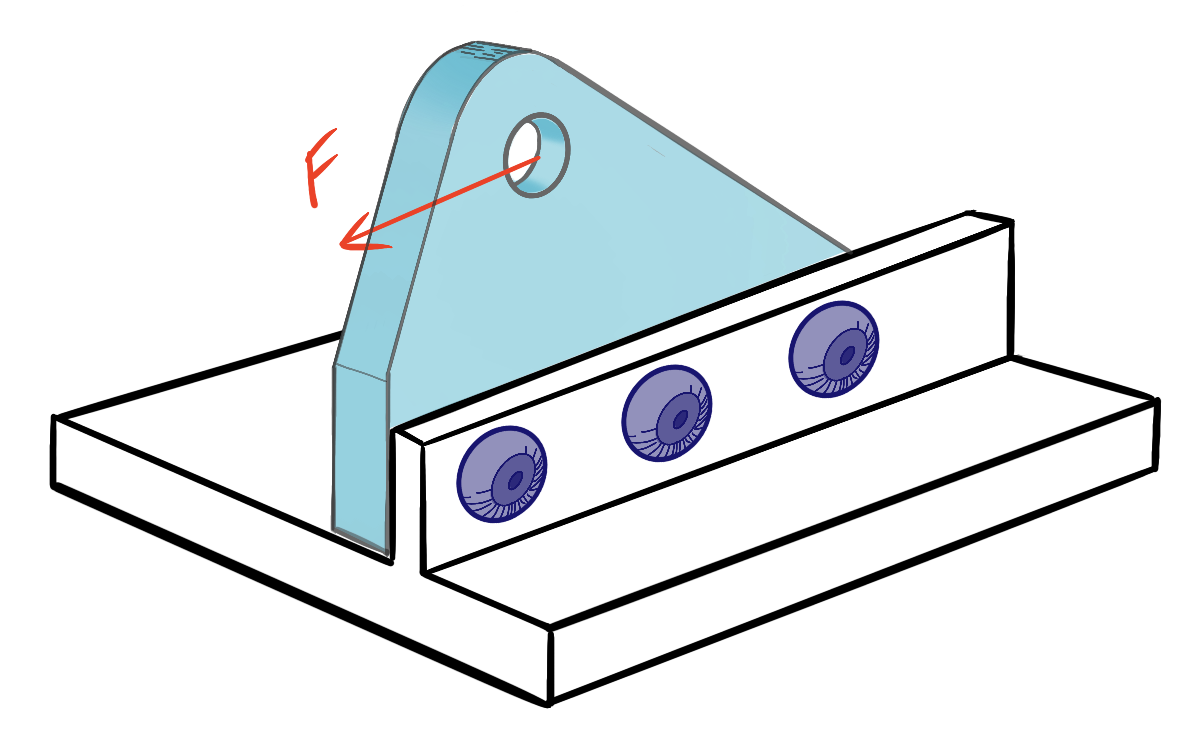
Design 2: Flat bracket with shear loaded rivets
These two designs are seemingly similar, but cause very different loading on the rivet groups used to fasten them. To understand the difference it helps to look at section views. For Design 1 we look at the rivet mid-plane parallel to the applied load via Section A. For Design 2 we look at the shear plane between the bracket and the flange to which it is fastened via Section B.
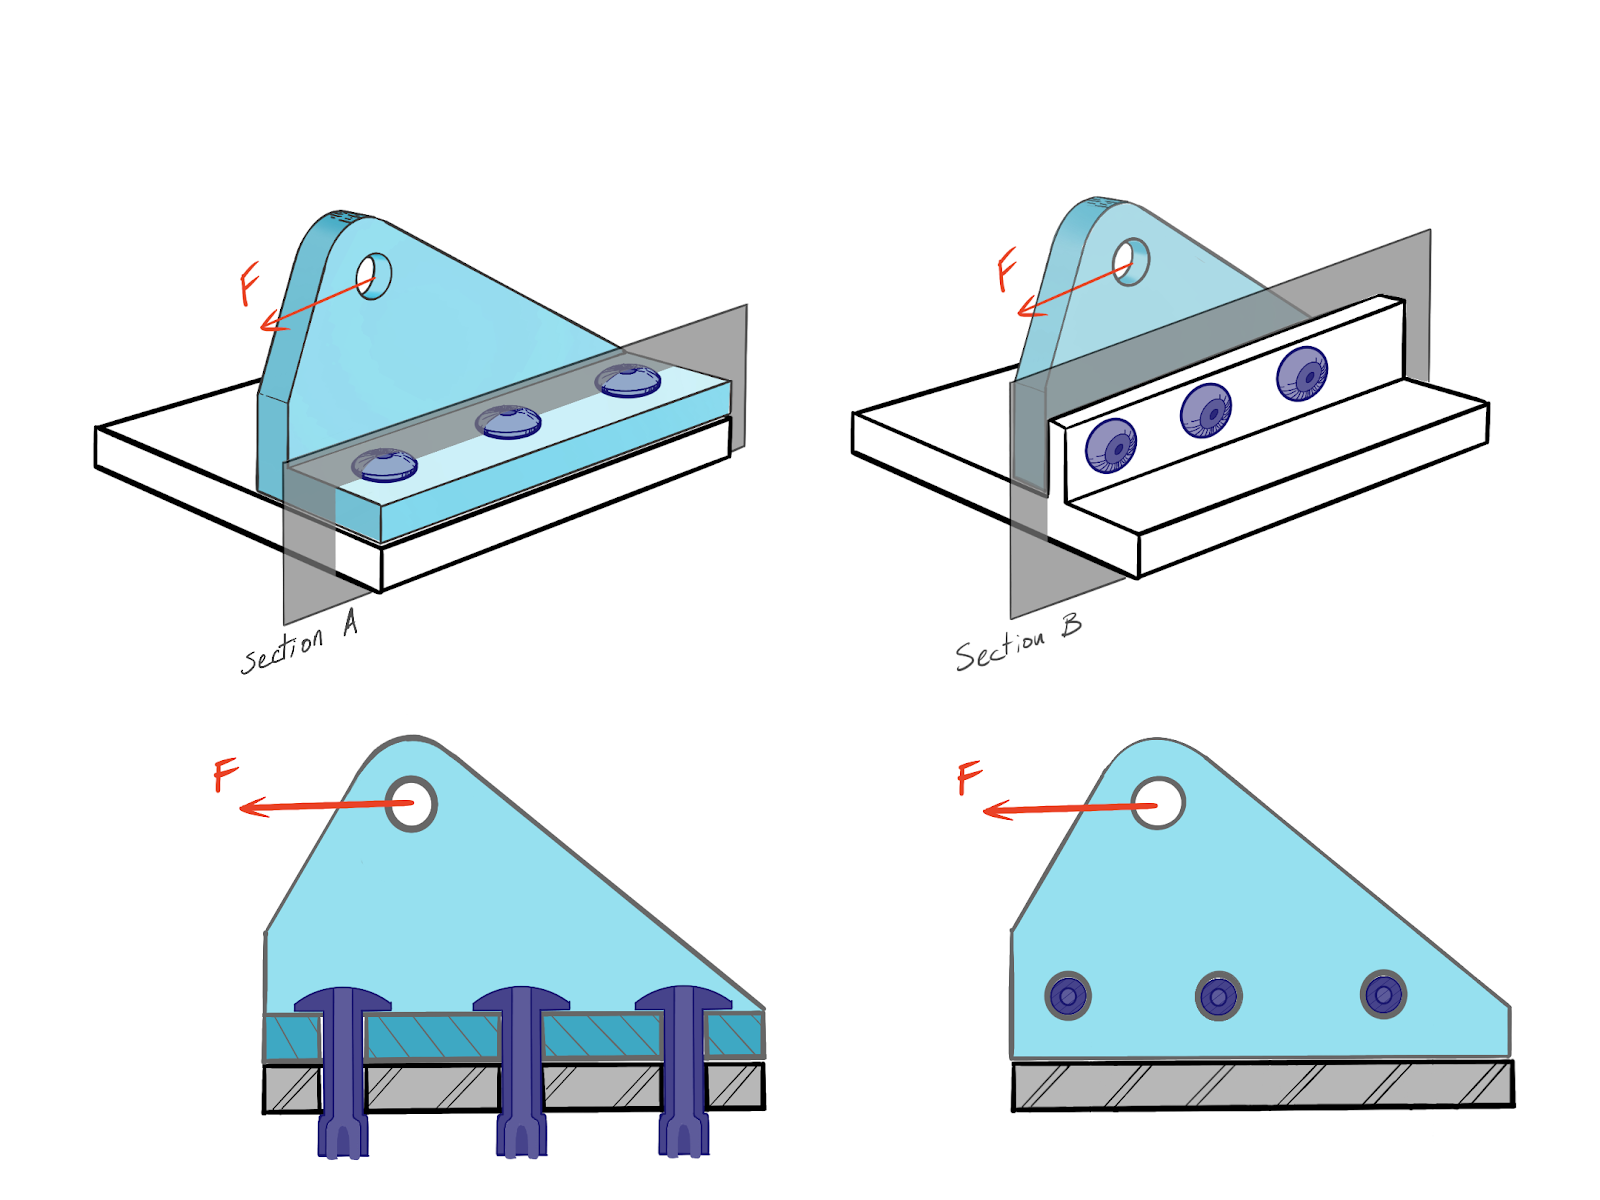
Section views at rivet shear mid-plane
In Design 2, the rivet loading is shear only. This shear is distributed across the rivet group by applying the force F and equivalent couple (F x r) at the rivet group centroid G. This means that the left and right side rivets bear the shear load due to the moment as illustrated below. Note: You can use the Five Flute Fastener Shear Analysis Template to run shear loading calculations on fastener groups in your own designs. There are several examples to help you get started.
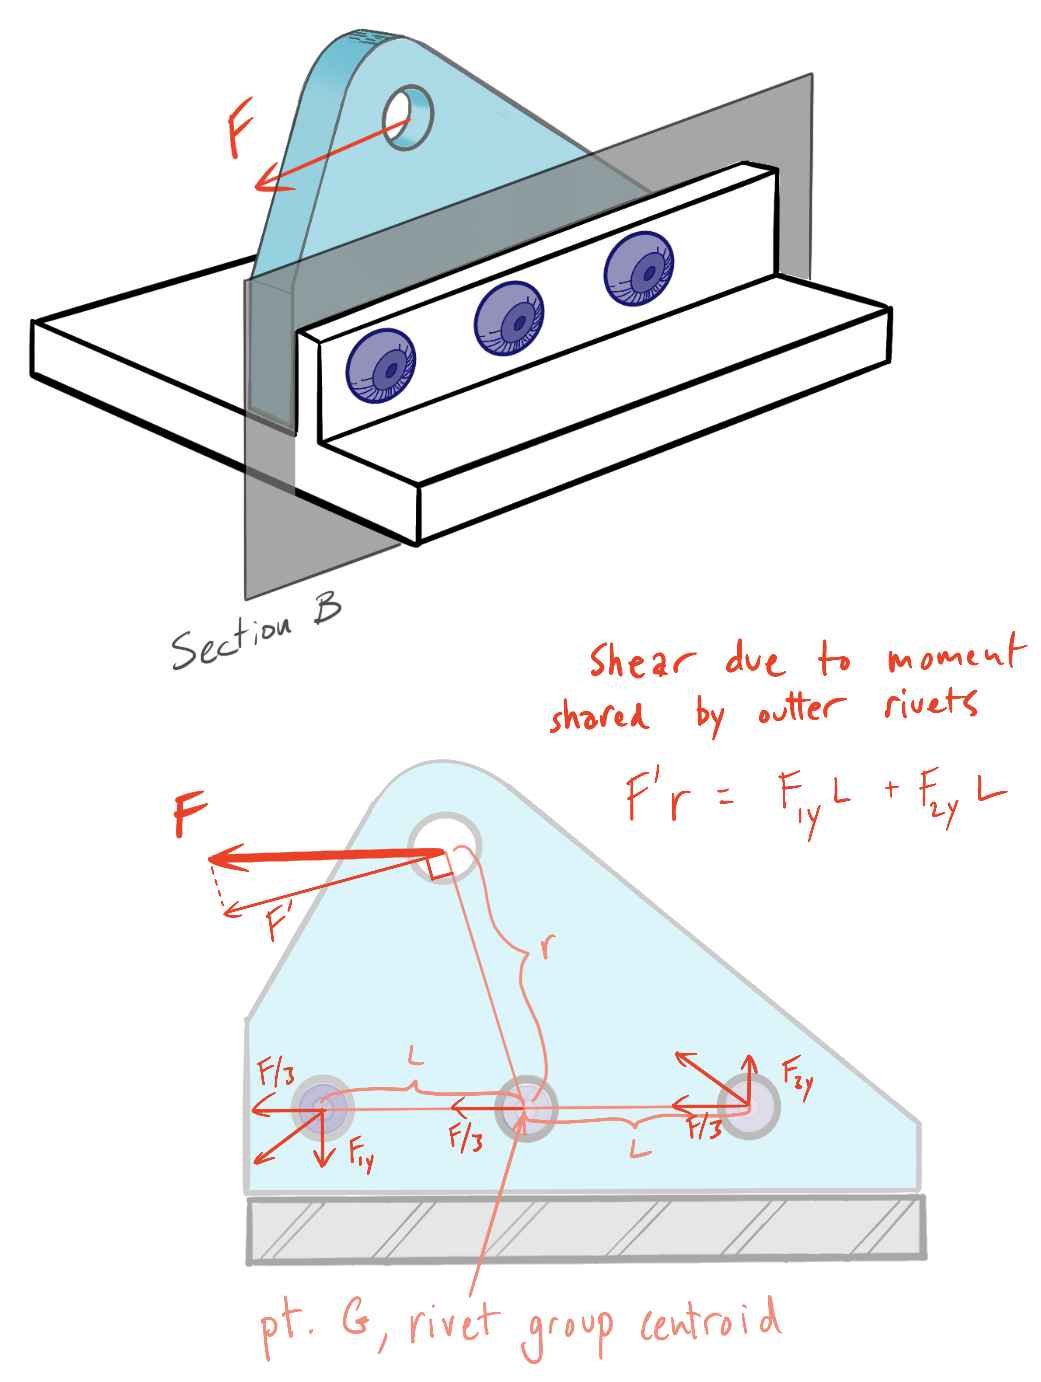
Rivet shear forces due to applied bearing load
In Design 1, all rivets experience combined shear and tensile loading. The shear is distributed evenly across the rivet group, but the right side rivet experiences the majority of the tensile load. A detailed derivation is not shown, but you can imagine the bracket pivoting about it’s leftmost contact point. The right rivet has the largest moment arm relative to this pivot point, so it will bear the majority of the tensile load. This uneven load distribution is illustrated below.
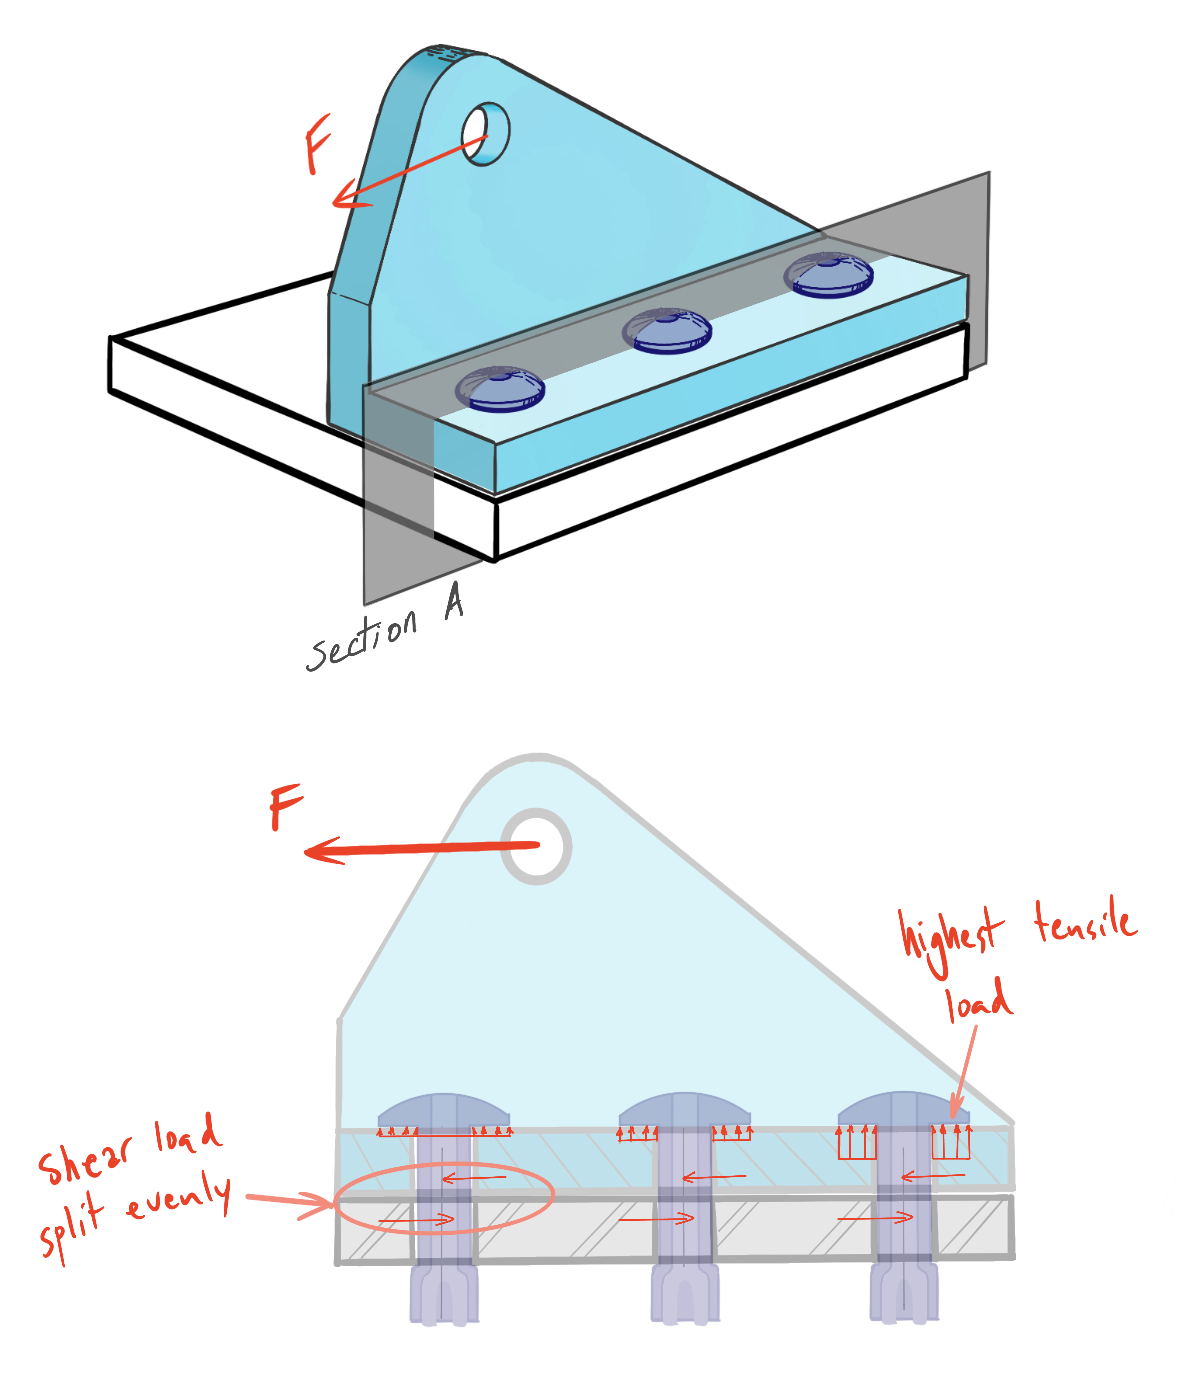
Rivet tensile and shear forces due to applied bearing load
Shear strength is greater than tensile, isn’t this a contradiction?
The astute among you will notice that we are contradicting the advice we gave earlier about loading bolts in tension and not in shear. This can be confusing. It doesn’t help that the static ratings for rivet strength in tension often exceed those in shear. Take this high strength structural pop rivet on McMaster. The tensile strength rating is 750 lbf and the shear strength rating is 600 lbf. One might assume that you would prefer to use this rivet in tension. In this case, static load rating does not tell the complete story.
We know from basic mechanics of materials that a rod in tension is stronger than a rod in shear. But this does not extrapolate well to rivet designs. Many rivets have a domed or countersunk head on one side, and a deformed shank on the other side. The interference fit of the deformed rivet shank on the side opposite the rivet head can cause stress risers that lead to local yielding. This might be fine for static loading because the material will yield slightly and redistribute the load. But when tensile and axial loads are combined, and the loading is dynamic or cyclical, slippage can occur in the joint well below static load ratings. This can cause the rivet to work itself loose or fatigue very quickly.
It is difficult to find guidance on the fatigue behavior of riveted joints because so much of the performance is a function of specific joint parameters like material thickness and fastener layout. A conservative rule is to never subject rivets to tensile loads greater than 10% of their rated shear load capacity. This is especially true when loading is cyclical, fully reversed or highly dynamic. For those looking for more in depth design guidance on rivet usage in sheet metal and aerospace structures, you might find Practical Stress Analysis for Design Engineers by Jean-Claude Flabel useful.
Takeaways
Perhaps the most important takeaway from this article is that fastener design problems should not be overlooked or underestimated. The ubiquity of fastener usage, coupled with the fact that in many cases fastener strength is nowhere near the limiting factor, can lead engineers to overlook detailed joint and fastener loading analysis in cases where it absolutely must be done.
The next takeaway is to always use good design practices when developing bolted and riveted joint designs. Be conservative in your designs as there are many factors that can impact joint strength that are hard to account for, such as stress concentrations, fastener strength variance, friction coefficient uncertainty, preload variance and installation errors among others. Consider the stiffness of the joint members and fasteners, and use this information to specify fastener material, grip length and diameter. When designing bolted joints, understand the importance of bolt preload for your specific loading conditions. Don’t just look up maximum preload from a bolt torque chart, but instead, develop a sound engineering rationale for your choice of preload. Follow through on this design decision by specifying the preload application method and understand the assembly implications thereof.
Lastly, it is equally important to validate that the correct preload was achieved to guarantee good joint performance in the real world. When factors of safety are high you can reasonably trust the numbers and lean on your analysis primarily. When factors of safety are low and failure consequence is high (ie: aerospace), empirical testing is often the only way to be confident that your joint design can cope with the anticipated loads. Thanks for reading and good luck with your designs! If you have any questions about this article please reach out to william@fiveflute.com and we can talk about it!
Five Flute - Next generation collaboration for hardware product development
If you are a design engineer or technical project manager and you want to design better products in less time, consider Five Flute. It’s the fastest way to share, review, and improve your engineering designs. From engineering drawing reviews to 3D design reviews of complex parts and assemblies, Five Flute is built for modern engineering teams that want to move faster without making mistakes.
Sources and Links
(1) NASA
(5) Eng-Tips Forum
(7) Advances in Aircraft and Space Science Journal

